Laser Technology's TruPulse 200/B laser rangefinder review
Have you ever heard of the saying "When the only thing you have is a hammer, everything looks like a nail."?
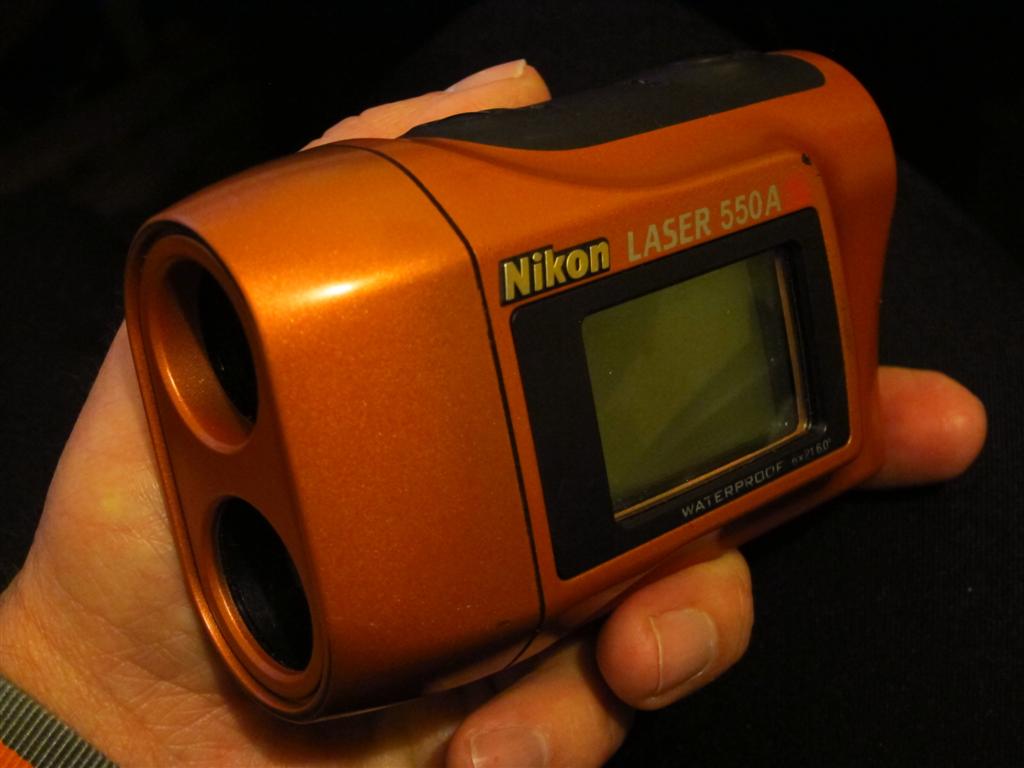
A few birthday's ago, I got a Nikon 55OAS laser rangefinder.
I got it from me because I knew that I didn't have one and they might be fun.
As soon as I had it, it became instantly important to know exactly how far away things were.
Anyone involved in a projectile sport where accuracy is required is familiar with the importance of knowing the distance.
The slower that projectile goes, the more important that knowledge is.
However, correctly adjusting your sights FOR that distance can also interfere with getting things right.
Let me tell you, knowing that the distance for indoor targets is 18 metres doesn't help if your sights are set at 70.
So once you get a laser rangefinder, you need to check stuff.
I found many reasons to check the distance to targets.
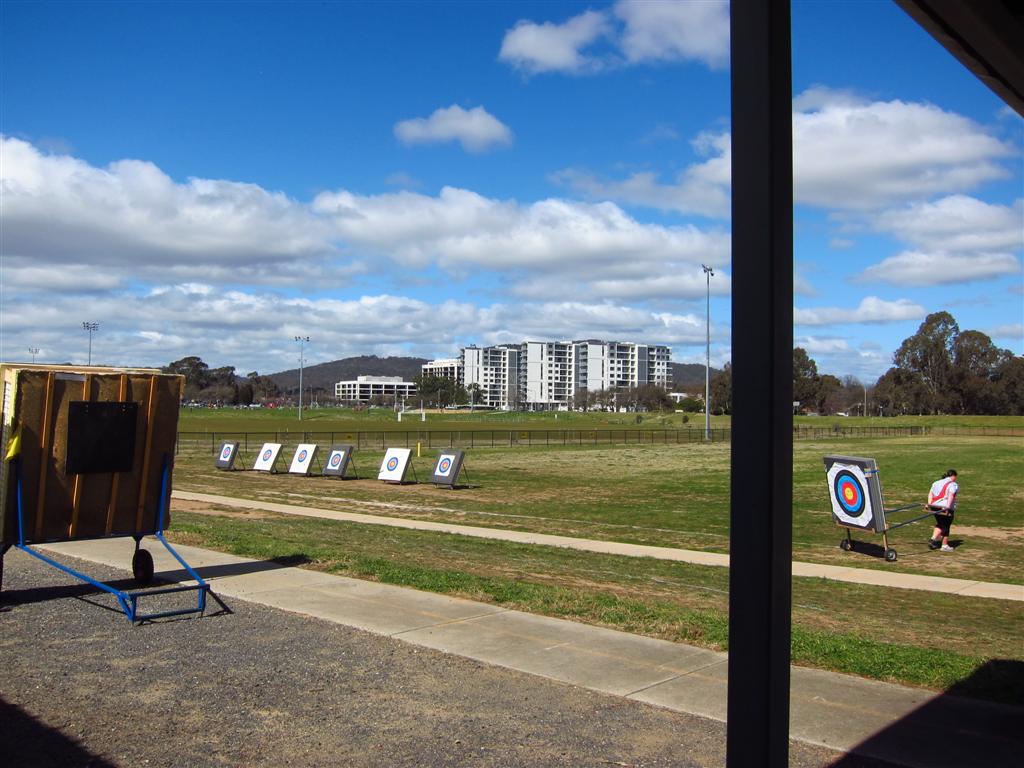
After all, just because the 30 metre distance is marked on the Canberra Archery Club field and fence has big signs that show the distance, doesn't mean it should be implicitly trusted.
Just like the 50, 70 and 90 metre signs.
Canberra Archery Club has also had some apartment blocks built close to the grounds in the last couple of years.
I discovered that it was important to know how far away from the club these
buildings are.
This distance should be checked every now and then too, to make sure nothing has changed.
Then the buildings behind that need to be checked as well..
Trying to measure any further away than that, the poor little Nikon runs out of puff.
The absolute best I've ever got out of it is across the lake to a white van, 639 metres away.
Considering that it's only rated at 500 metres, that's not too bad.
I have a sneaking suspicion that it actually runs out of brains to figure things
out.
500 metres really ought to be enough for most purposes for most people, but what
if I want to try flight archery?
I might get an arrow that far or further..
The Nikon 550AS tells you parts of a metre when you're under 100m.
It's other neat feature makes it attractive to archers.
It has an inclinometer and will work out the angles if you point it down or up
and give you the horizontal distance instead of straight line distance.
If you worry about hitting a target situated on other than level ground, you'll know how important it is to get the horizontal distance correct.
Particularly at steep angles.
However, lately I got another rather impressive optical toy and now 500m ( Or 639! )doesn't seem that far away any more.
So I started wondering about rangefinders with a bit more grunt.
A hunting friend suggested that I have a look at some of the Bushnell hunting ones that go out to 1600m.
I'd also heard some good things about the Leica 1600's.
So I got on the Internet and smashed google about to see what popped up.
That's when I discovered that there was a brand that hadn't remembered hearing of before:
Laser Technology.
Most of you would have seen things that they make, but you probably didn't want to see them.
Laser Technology manufacture and sell Laser Speed Gun technology all around the world.
This is important to remember.
However, it looks like they pretty much invented laser rangefinders.
They seem to have a lot of patents on them.
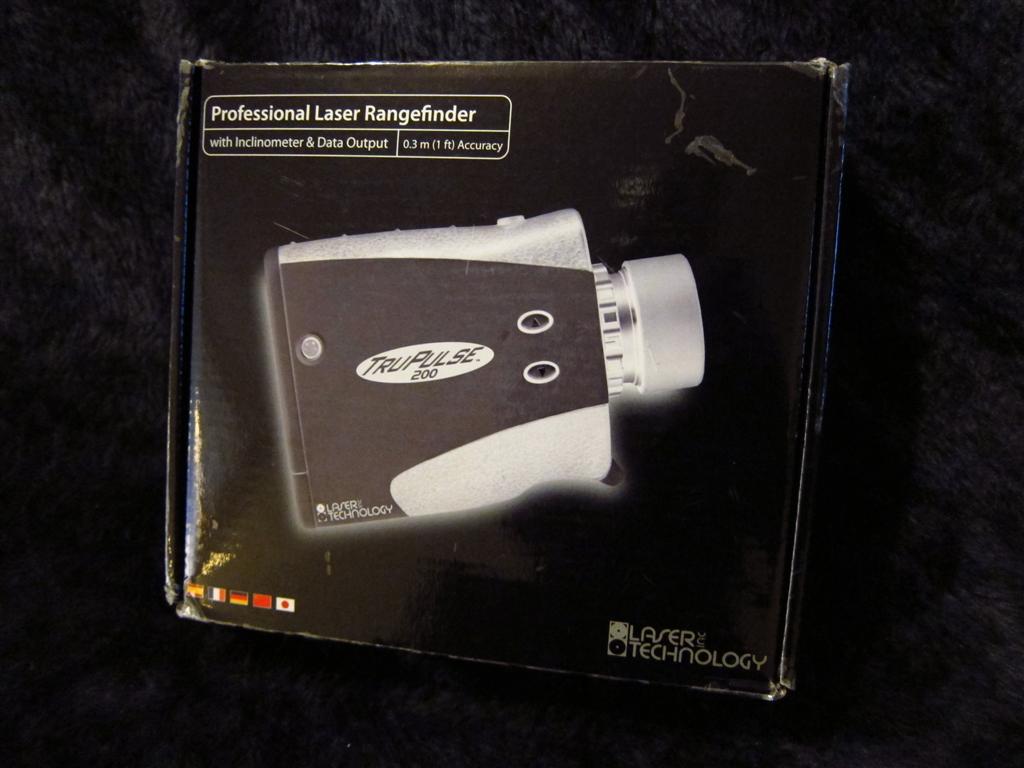
Laser Technology manufacture Laser Rangefinders which they call the TruPulse series.
I was interested to find that their website describes their 200L as a "professional laser rangefinder at a consumer price?"
What the hell is a professional laser rangefinder?
What do professionals use?
Is my trusty little Nikon non professional?
So I asked via the Lasertec.com website for a quote on the 200L and got an email from Michael Lack of
Laser Technology Australia the next day.
However, there were a few things I really liked about the slightly upmarket model, the 200/B compared to the "consumer level" 200L
The first thing was that it took AA batteries. Standard AND rechargeables.
That's a big deal. I'm not a fan of uncommon batteries.
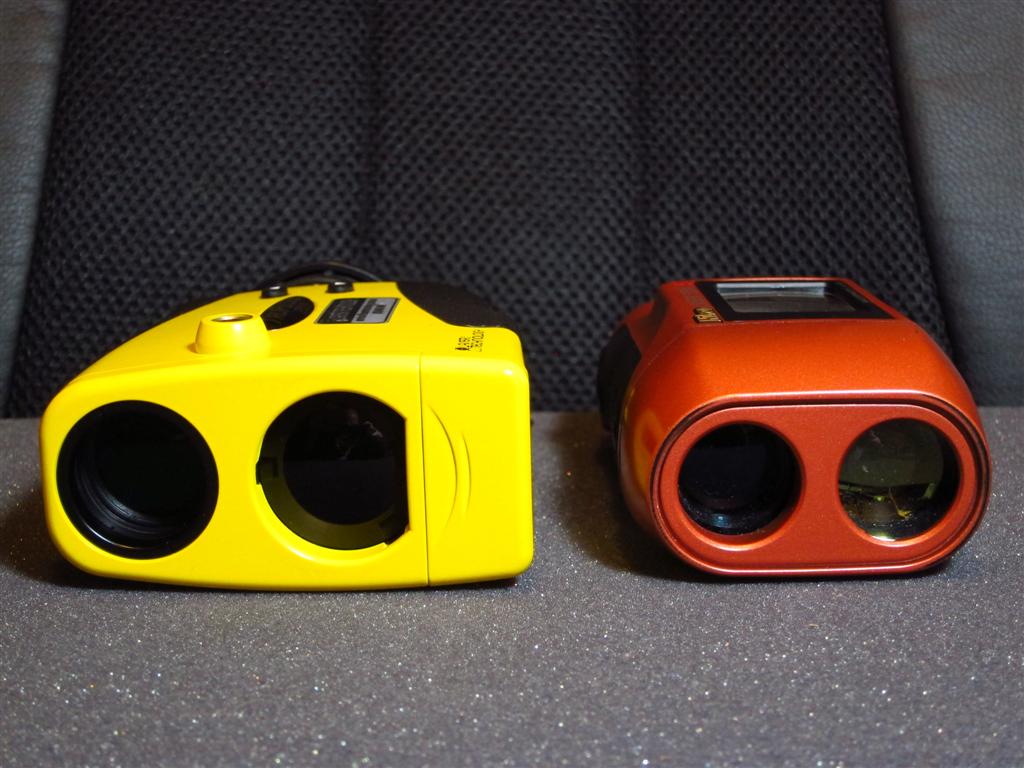
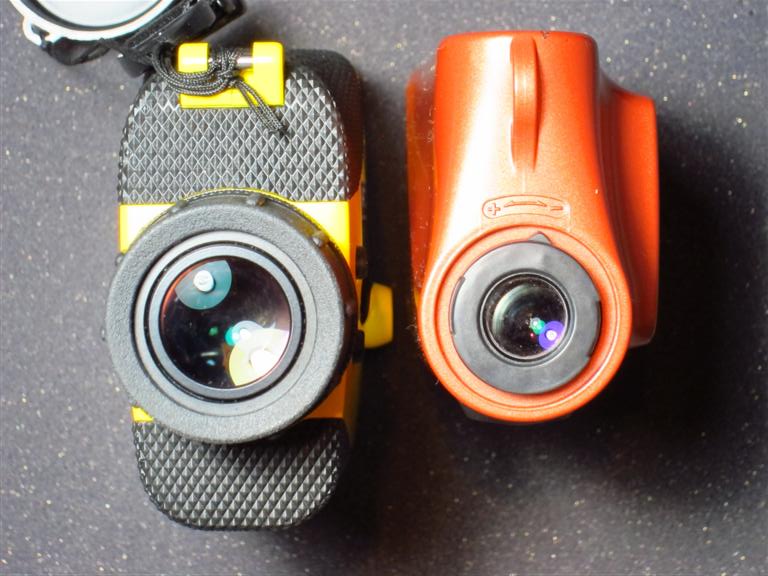
The Nikon has a 6x finderscope.
The 200L has a 4x.
The 200/B has a 7x.
This is important.
I want to be able to see clearly what I'm shooting an invisible laser at.
The 200L has a total maximum range of 1750m on non reflective and reflective targets.
Reading between the lines with the 200L, this one has probably been wound back a bit to separate it from it's bigger brother.
Accuracy wise:
The 200L is +/- 1 metre accurate.
The 200/B is quoted as +/-.3 to 1m out to the maximum range of 2000 metres
.
Now, if that's not enough, the even more expensive 200X is good for +/- 4CM to 30CM accuracy.
All the way out to 2.5km on something reflective and 1.9km on something that isn't.
That's just a little bit insane and you all know when things get insane, the price tag goes along for the ride.
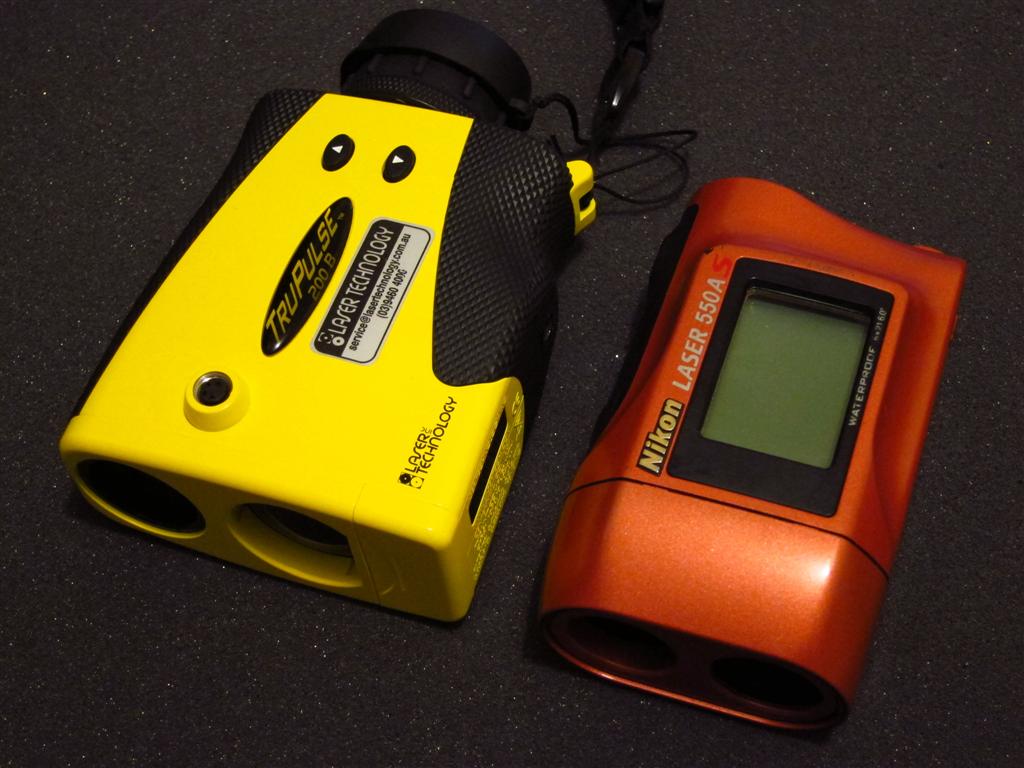
Of course, the big kicker with the 200/B is that it is available in a wide range of two colours. Yellow and Grey.
You can get a silicon pimp kit for them, which covers most of the original surface colour in Camo, Tan, Orange and Maroon.
(Yes. I wondered about Maroon too.
It appears to be the Laser Technology company colour. )
For even more fun though, the 200/B has bluetooth connectivity for exporting data!
I asked lots of questions and Michael eventually offered to send me a demo unit to evaluate.
So I said no thanks. I wouldn't like that at all.
(There, see. I wrote some fantasy. Take that, Tolkien, Martin and Rowling!)
HELL YES!!
It turned up the next day.
But before we get to that, how the hell do these things work?
If we look at how measurements are taken with light, you have to remember a few basic details.
It’s relatively easy. You could do it with a torch.
Just wait until it gets dark. Hold your torch level with your eyes, point it at what you want to measure and turn it on.
The time taken from when the light leaves your torch, bounces off the object you want to measure to and is seen by you, divided by two, times by light speed will reveal the distance to the object you shone your torch at.
Actually, this is so simple, you may wonder why people buy laser rangefinders.
Light travels 299,792,458 metres in a second.
Fire up your torch on what you want to measure the distance to, hit the stopwatch and if 1/ 1665513.655555556ths of a second later, the photons hit your eyes, you’d best hit the stop button again.
The time the light took to get there and back, divided by 2, divided by the speed of light tells us that the target is 90 metres away.
If we consider the average reaction time of say, 16 milliseconds between your eyes, brain and finger, this will put the measurements off by a bit.
If light travels 299.8mm in 1/1,000,000,000 of a second (a nanosecond) and you’re 16 milliseconds (16 million nanoseconds) out, that will put your measurements off by about 4800 kilometres.
Such levels of timing inaccuracy will significantly affect your sight settings.
I’d recommend using your index finger to trip the stopwatch rather than your thumb.
This will help your accuracy by maybe 700 to 800 kilometres.
If you could shine a light powerful enough to illuminate the moon, you could turn it on and see the moon light up about 2.56 seconds later.
Of course, it also means that you’d see the moon go dark 2.56 seconds after you turned your light off.
(This would be an incredibly handy delay on a bedroom light switch..)
I was wondering why the readouts on laser rangefinders didn’t have a backlight
option so that you could use them in the dark.
This question was instantly followed by the realisation that you can’t aim an optical device in the dark without light, so there’s really not much point in having a lit up readout.
Nice one, idiot.
During the day, you have a lot of visible light, so using visible light to measure
distance is out of the question.
It would be almost impossible to detect, like life insurance salesmen at a suicide bomber conference.
So we get around that problem by using a specific frequency of light generated with a laser.
A laser with a wavelength of 900 nanometres, which puts it into the infrared spectrum.
The sun of course, puts out a mountain of infrared light, but if you’re only looking for a specific frequency, you’re in with a lot more chance.
So when one activates the firing button on this laser rangefinder, it blasts out an invisible beam of laser power!
How powerful, you ask?
Will you have to wear safety goggles to use this?
Will it allow you to drill steaming holes through the neighbor’s cat?
Well no.
(But I tried, just to be sure.)
Get out your TV remote control and point it at your face.
Give yourself a blast of that.
Did it hurt?
Now point it at your wife and try to turn her volume down, you’ve just hit her up with about 20 times the power of the laser in the rangefinder.
The invisible beam is also pretty damn narrow.
Roughly 30cm wide at 100 metres.
This is also another important thing to keep in mind.
Remember what else this company makes?
Laser Technology is an American company and this is a quality feeling unit.
Solid and well made with just enough weight to give a feeling of confidence
without heft.
It's proudly made in.. er. Japan.
But that's okay!
Nikon is another fantastic Japanese company with a history of making high
quality products.
My two main DSLR cameras are Nikons and my rangefinder is made in..er....China.
The Demo 200B came in hard to lose yellow.

One of the first things I always assess when encountering a new device is:
Has it been designed to be operated by complete idiots?
Will I have to read the directions to get some basic functionality out of it?
So I checked it had batteries, grabbed the Nikon for comparison testing and walked out the door.
The Nikon has two buttons on top of it.
Fire and cycling through the options. The Trupulse has one on top and two on the side.
That thing towards the front is where you can plug a serial cable into it.
Yep. It does serial data export!
It's a little taller and wider. You know it's in your hand, but not excessively.
Small hands may have trouble. Another good reason not to let your kids play with
it.
A combination of holding down and pressing either the up or down arrows on the
side of the TruPulse allows you to cycle through functions, options and
poking both turns the unit off. ( if you can't be bothered waiting for it to automatically turn itself off.)
The device also fires up in the same mode that it was last used.
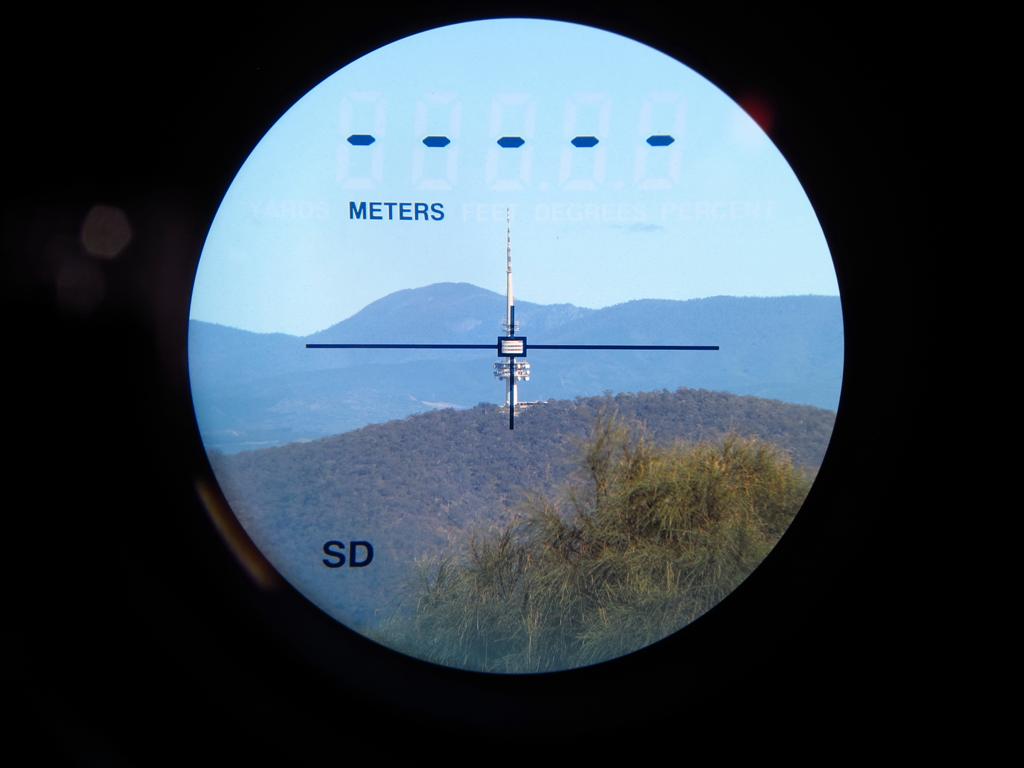
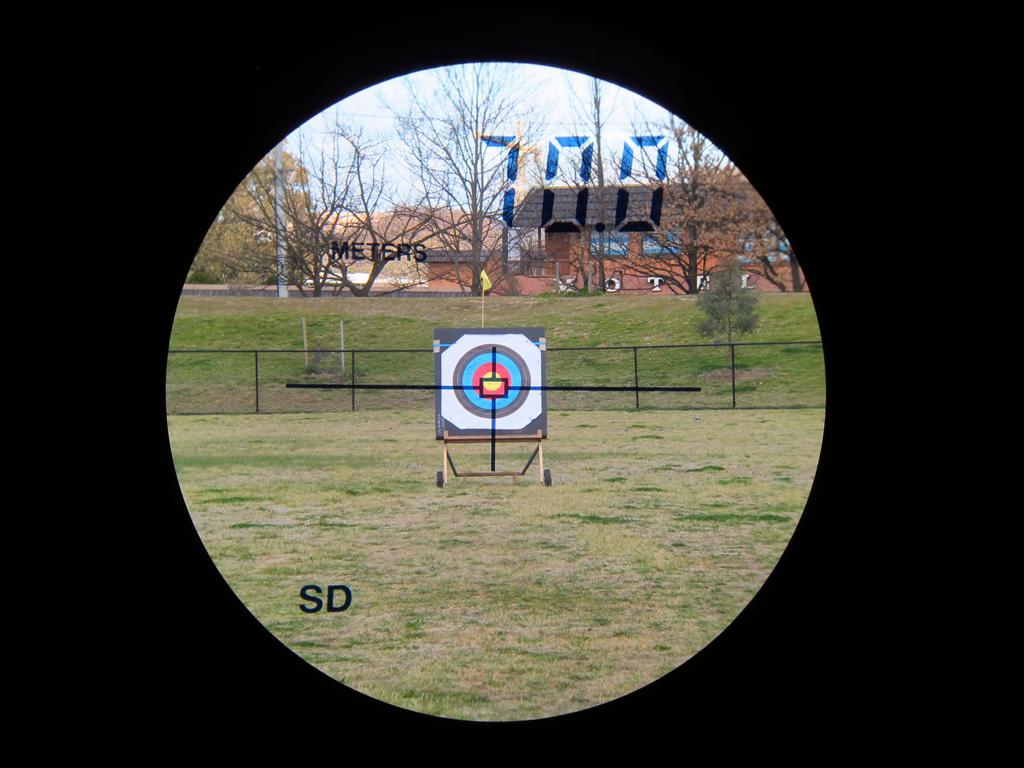
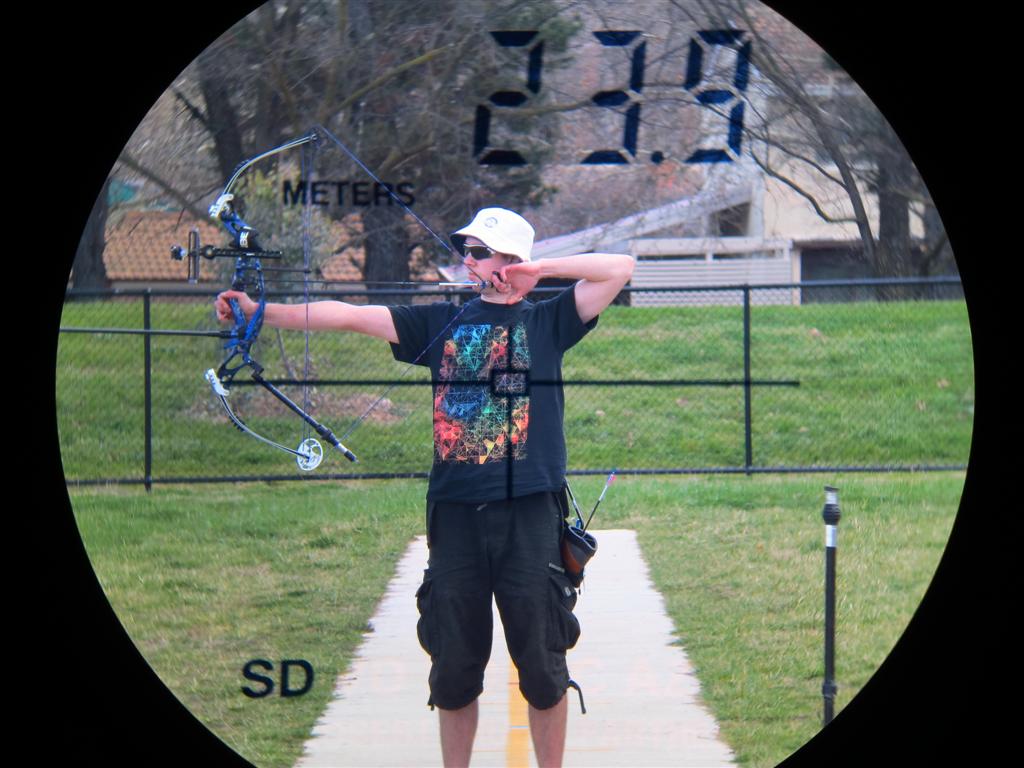
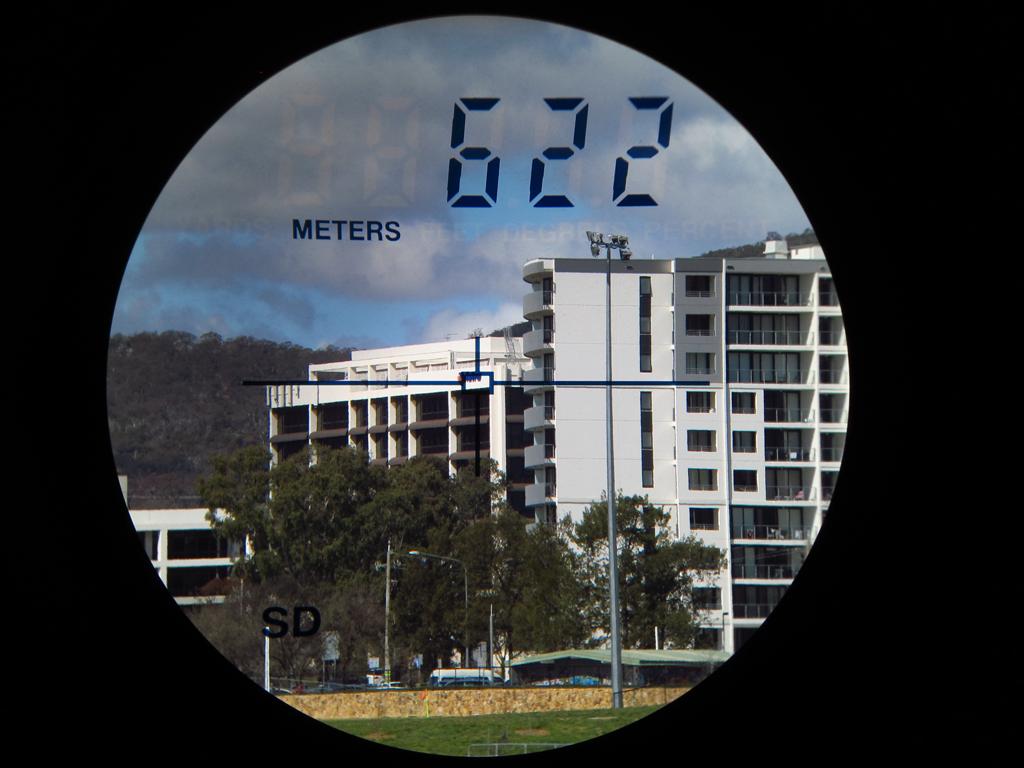
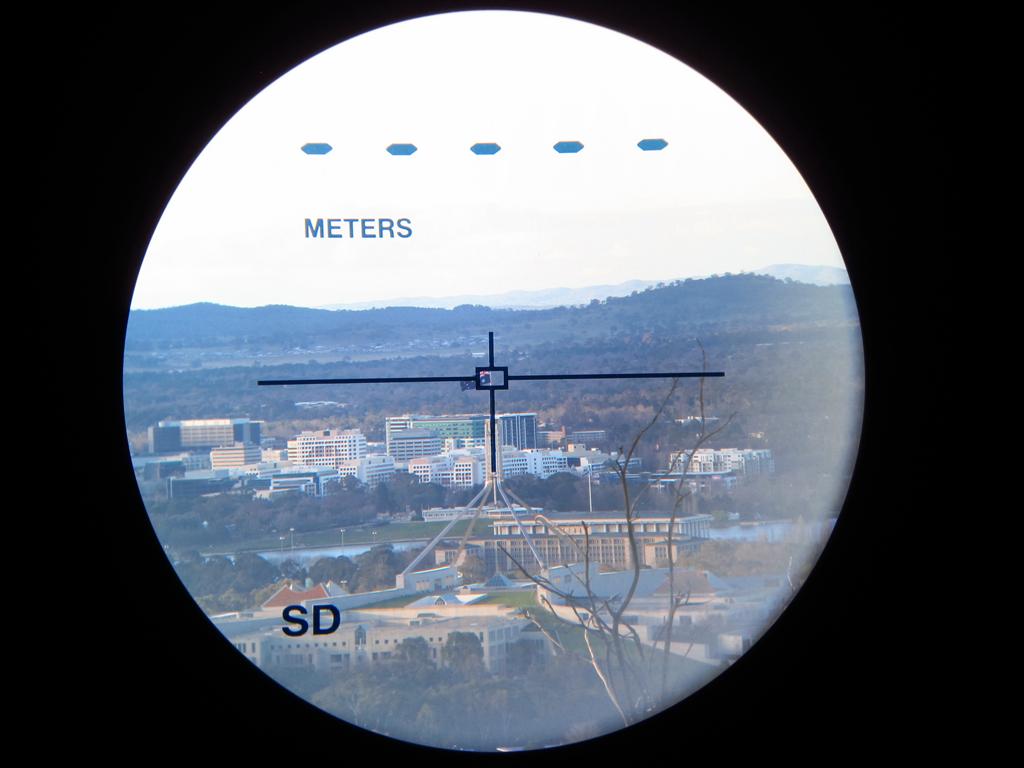
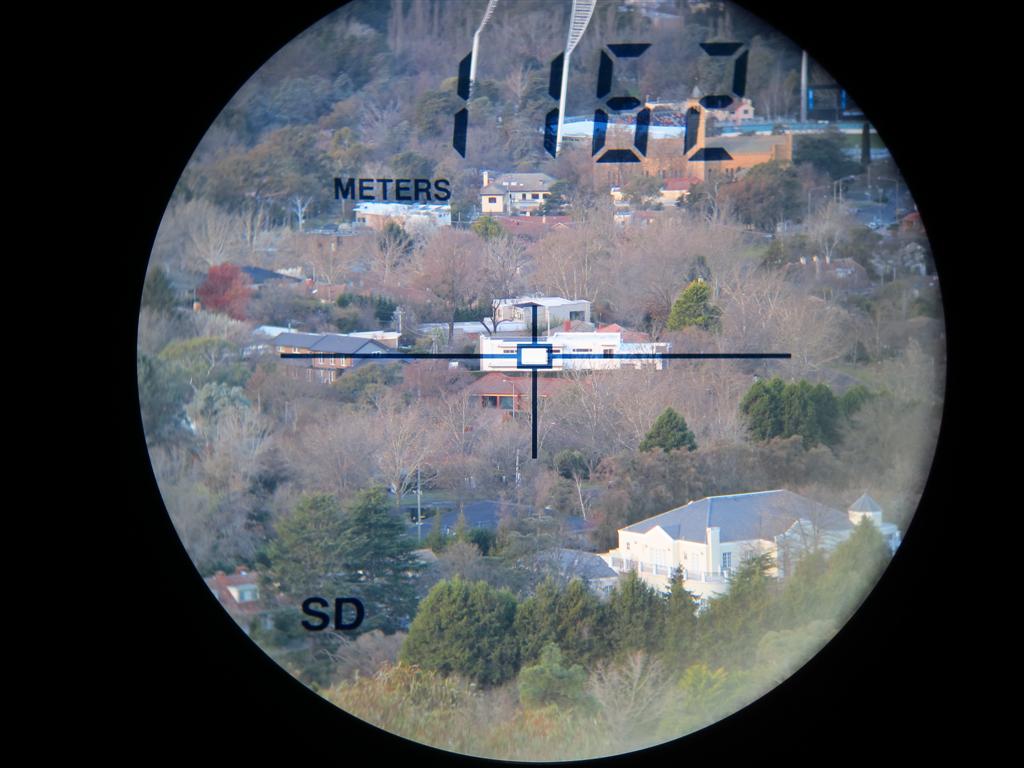
Handily, it was left in SD mode, which stands for “slope distance”.
This is the simplest mode of all and tells you how far away from you in a straight line your target is.
From my normal testing area, ie, the end of my driveway, I could easily hit items out to 320 metres.
After that, because I’m in a valley, the next targets to play with are around 1000 or more metres.
My favourite optical assessment target is 1.4km away and I was a little disappointed that I couldn’t get a reading
from that.
However, the specifications DO say that best distance to NON reflective targets is 1km.
I’ll need reflective targets over that, so I’d need someone to park their car in a no parking area to even be in with a chance at my regular long distance optical testing sign.
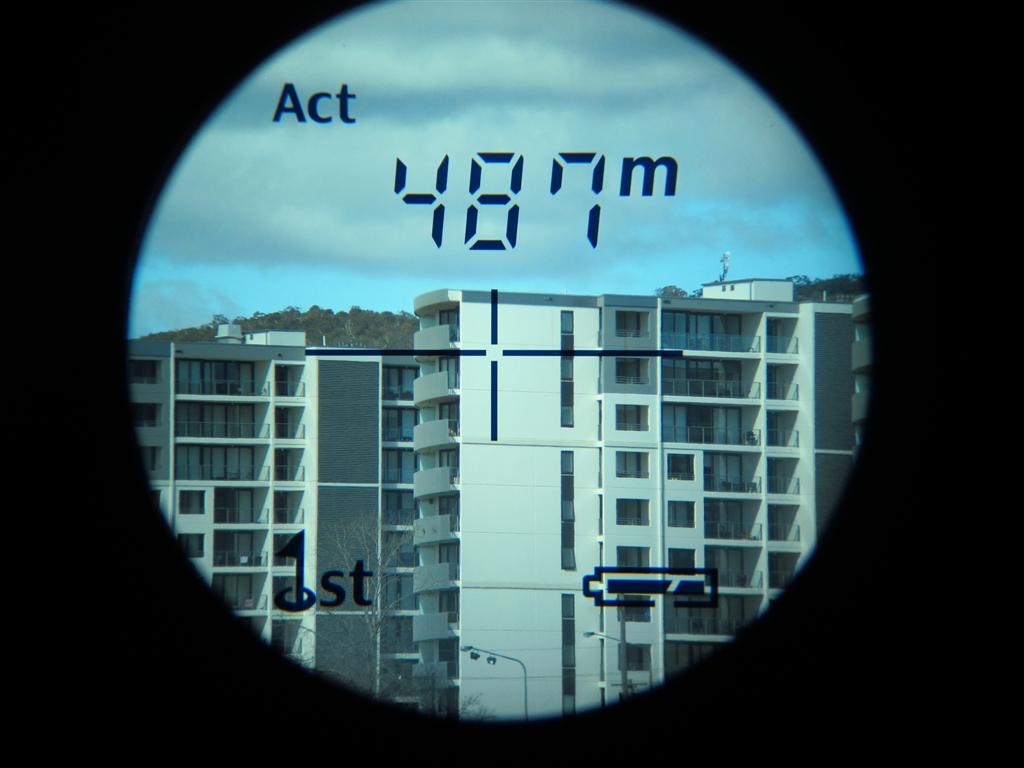
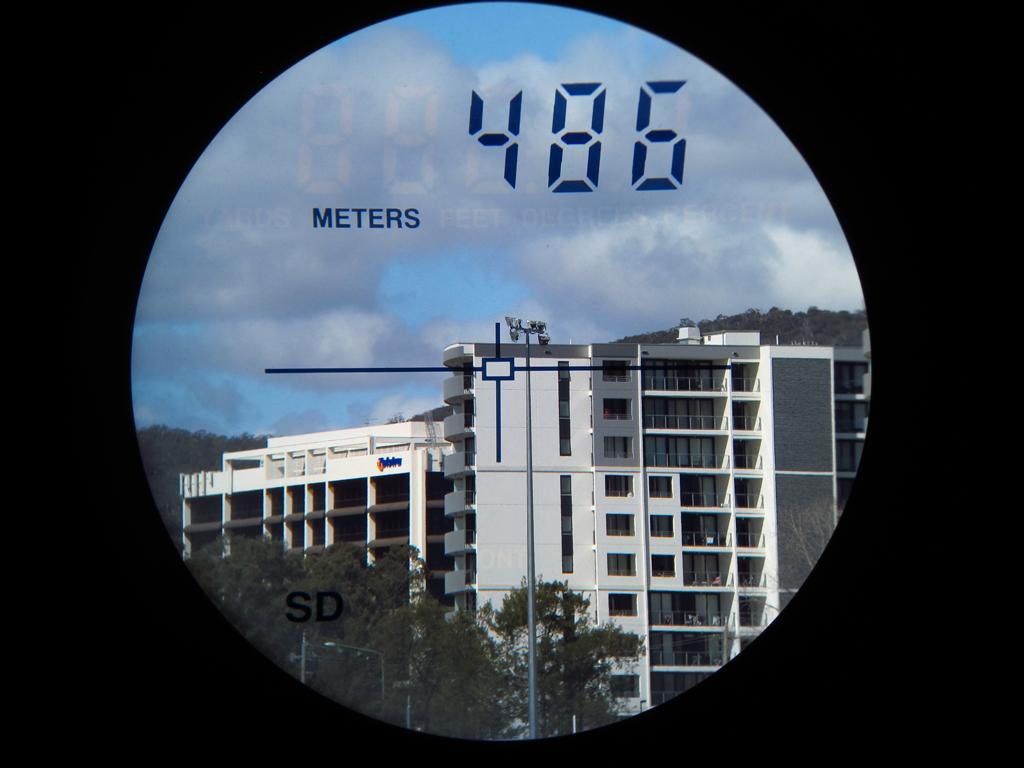
The TruPulse and Nikon read exactly the same on everything I could get a response from.
That’s encouraging.
However, the TruPulse got responses from things the Nikon couldn’t, like the tops of lights 360 metres away.
Any time something within normal range wasn’t picked up by the Nikon, the TruPulse normally got it until I went really stupid at really small things.
Disappointed at not finding anything over 600m, I wandered around to where there was more open ground near the major arterial road.
There I found a couple of bus stations and then I spotted a big green traffic sign.
Bingo. 794.6 metres away.
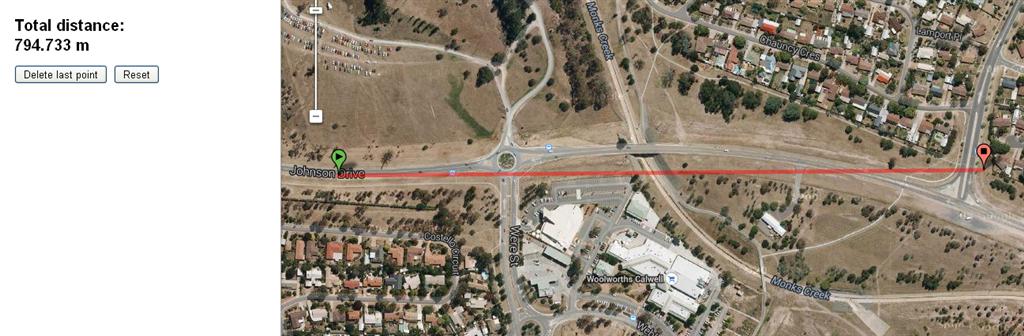
Er, what?
I’m only used to seeing decimal places at less than 100m on the Nikon.
Okay. I’ll see how good this thing is.
I lased it a few times and it stayed at 794.6.
I took a step back and hit it up again.
The measurement went to 795 dead.
I’ll admit that I was impressed.
I spent a bit of time measuring the consistency of the decimal level decisions and wandering backwards and forwards to see if it could pick up small changes consistently.
It worked faultlessly.
Eventually, it got dark and I got sick of the weird looks from people walking their dogs, so I went home.
On the way home I saw a fluffy black cat climbing awkwardly along the top of a fence, so I figured that it would serve as a good natural non reflective target.
I zapped it repeatedly between 26.5 and 42 something metres.
It was a totally unreasonable expectation to think that it might fall off the
fence, having been shot at with lasers.
It was a bit disappointing that it didn't.
I decided that it was time to read the field guide and even the manual.

The guys at Laser Technology sent me the links to the video training on youtube, so I watched them first, then read the manual.
I learned a few important things that aren’t obvious.
The laser will run for up to 10 seconds if you keep the button held down.
It has a few goes in that time at getting a good return signal.
So if you don’t get it in the first press, let it run a bit.
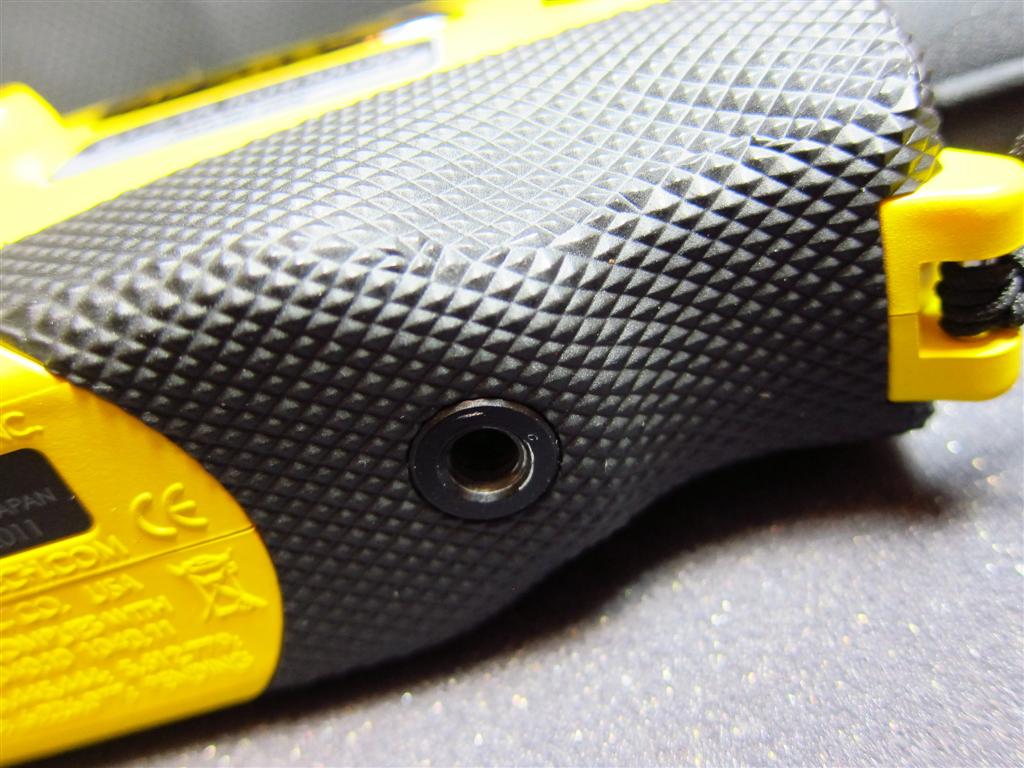
This is where a tripod mount is incredibly useful.
It is possible to hold it on targets quite a distance away, but not easy.
When you get a reading with a decimal point, it’s also a sign of a high level of confidence and an indication that the signal strength was good.
Laser Technology’s website does say that the devices will pulse at up to 60 times a second during measuring, so common sense would say that all these readings would be stored and averaged.
If they’re close together because of something like a good signal from a reflective object, the accuracy level confidence will increase and the rangefinder will offer a more accurate reading.
Friday night offered some opportunities to visit another place I’ve used before
when testing the Nikon.
The elevated carpark at the local shopping center gives me a straight view down the road at parked cars and other things in a wide radius.
I was easily able to get readings from car numberplates out to 770 metres, at which point the road bends and I can’t see any more cars.
I discovered that if I zap scotchlite reflective surfaces with the Nikon, under about 40 metres, it won’t read it at all.
I can only surmise that the detector is overloaded.
The TruPulse suffers not from such problems.
It will actually read down to .1 m if you hold your hand in front of it.
At that point, I'd use a ruler.
Under ten metres with the Nikon, it must figure that you should be using a tape measure.
I was able to see quite a lot of suburbia from the top of the car park, but I wasn’t able to get many objects to range at long distance compared to what you might expect.
This is not surprising.
Remember what modern surface finish technology has done for us?
It resists colour fading.
Almost every painted or coloured surface exposed to the weather these days has IR and UV absorbent qualities.
If it’s out in the sun, it’s been tweaked to make it last longer. Most man made surfaces are reasonably IR energy absorbent.
This neatly dovetails into another small bit of information I gleaned while talking to one of the AWA defence engineers many years ago.
He was one of a team who designed and built the portable speed cameras for the
South Australian Police at the Defence Science and Technology Organisation.
He mentioned that a lot of European cars were very difficult to get a decent signal return on because of their paint protection treatments.
It is very effective at absorbing IR and UV solar radiation.
THAT is very interesting.
South Australia introduced some legislation to prevent people putting their number plate in behind plastic covers.
Number plates, being extremely reflective with their tiny cats-eye reflectors,
give excellent IR laser signal returns.
That’s why I will get the best and most accurate distances from handy roadsigns.
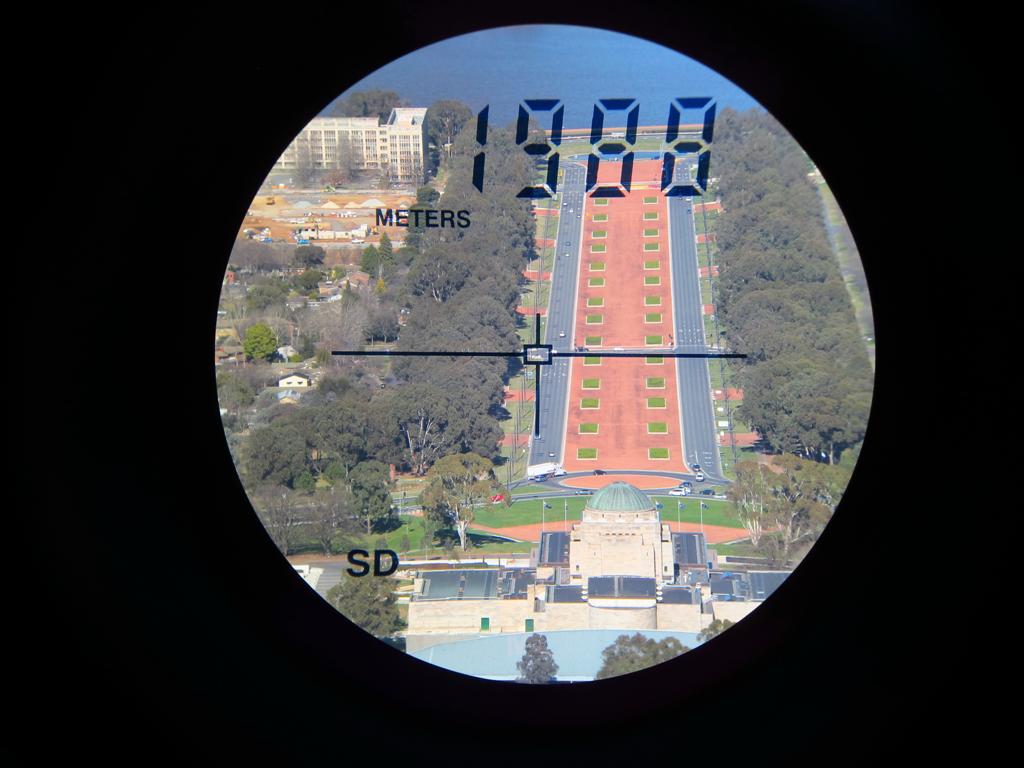
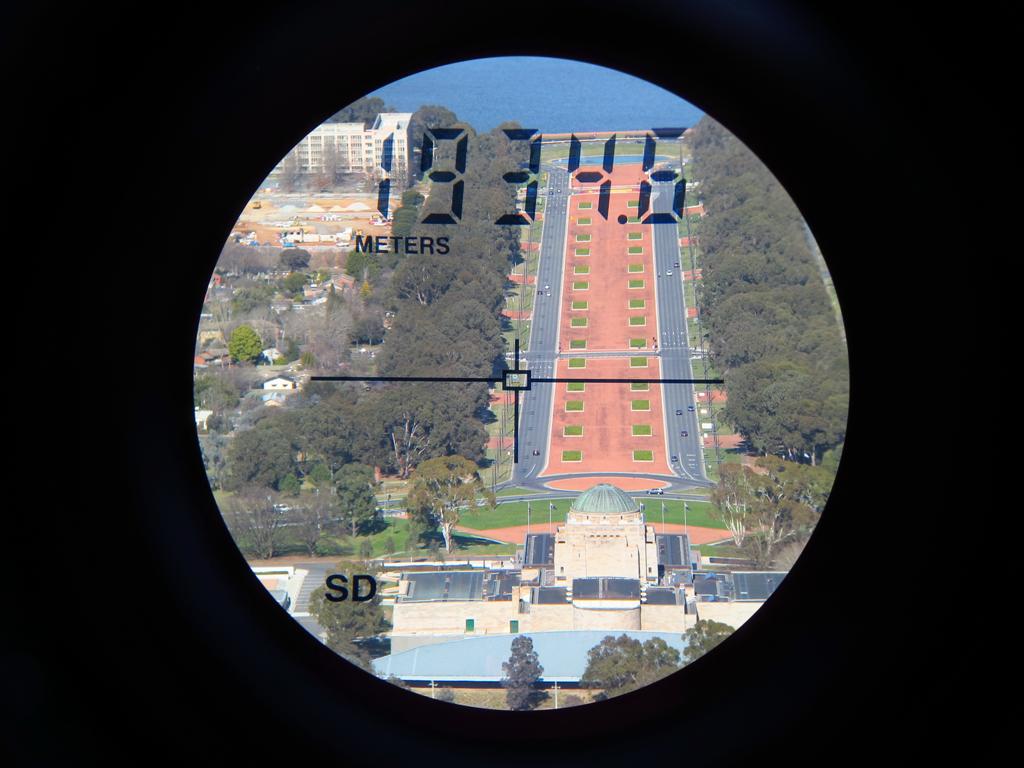
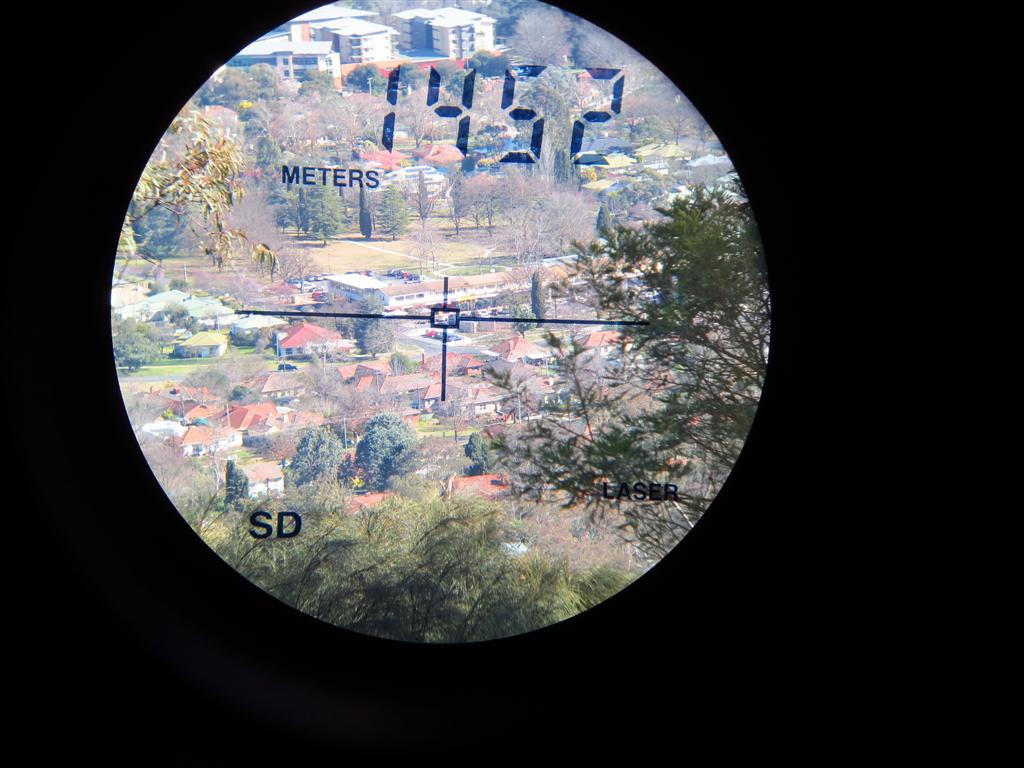
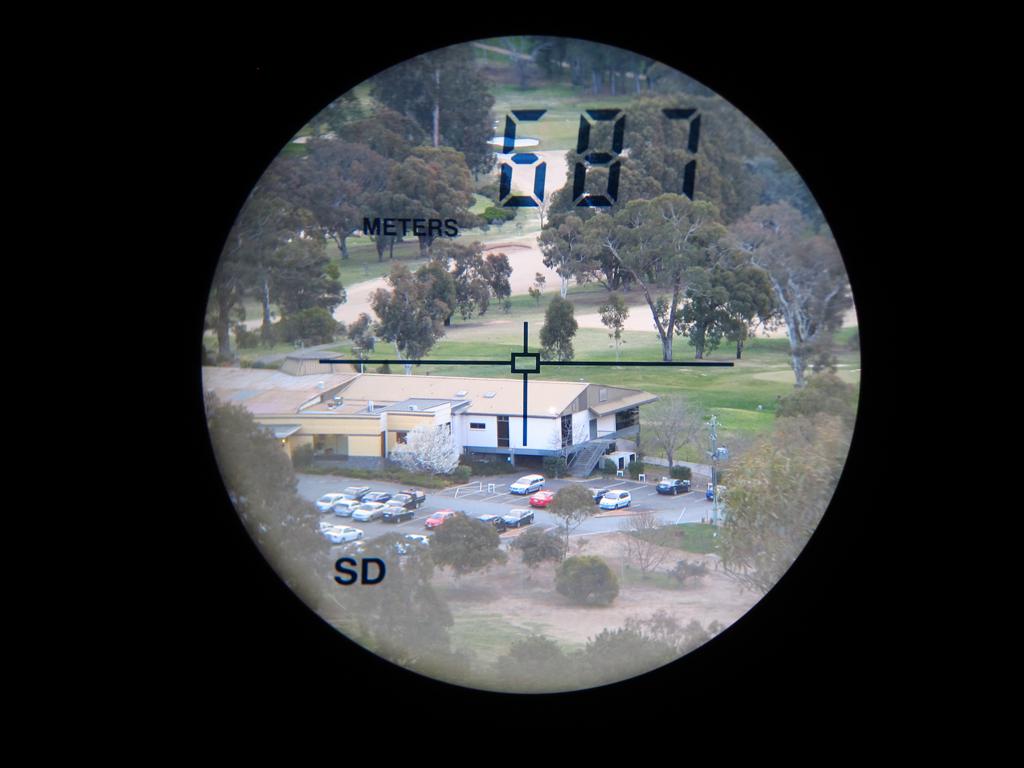
Saturday morning presented the opportunity to get to the top of Mt Ainslie lookout and look for prospective reflective targets.
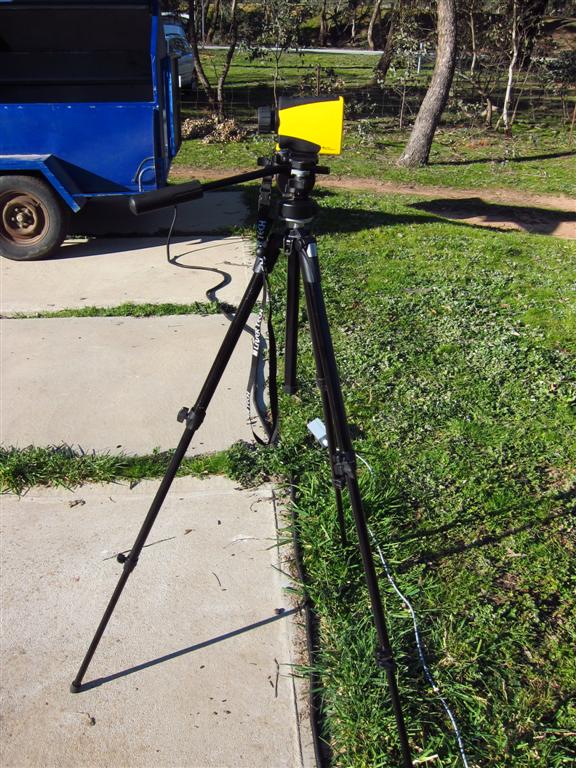
With the 200/B on the tripod, I sat off to the side of the main viewing area
near the edge and looked for roadsigns and number plates in the vista below.
There were plenty and I zapped them at increasing ranges as I spotted them.
This was as far as I got. You know, I reckon it might have another 12
metres in it
The tripod let me collect the photographic evidence easily and the retractable eye relief cover helped significantly.
I just held the camera up to the eyepiece with it turned up to the longest eye
relief setting. The dioptre adjustment on the eyepiece is also excellent.
It lets you adjust for individual viewing requirements and keeps the display and
view in focus until targets get really close.
(Some of the images aren’t perfectly aligned as one does tend to move things while taking photos.
)
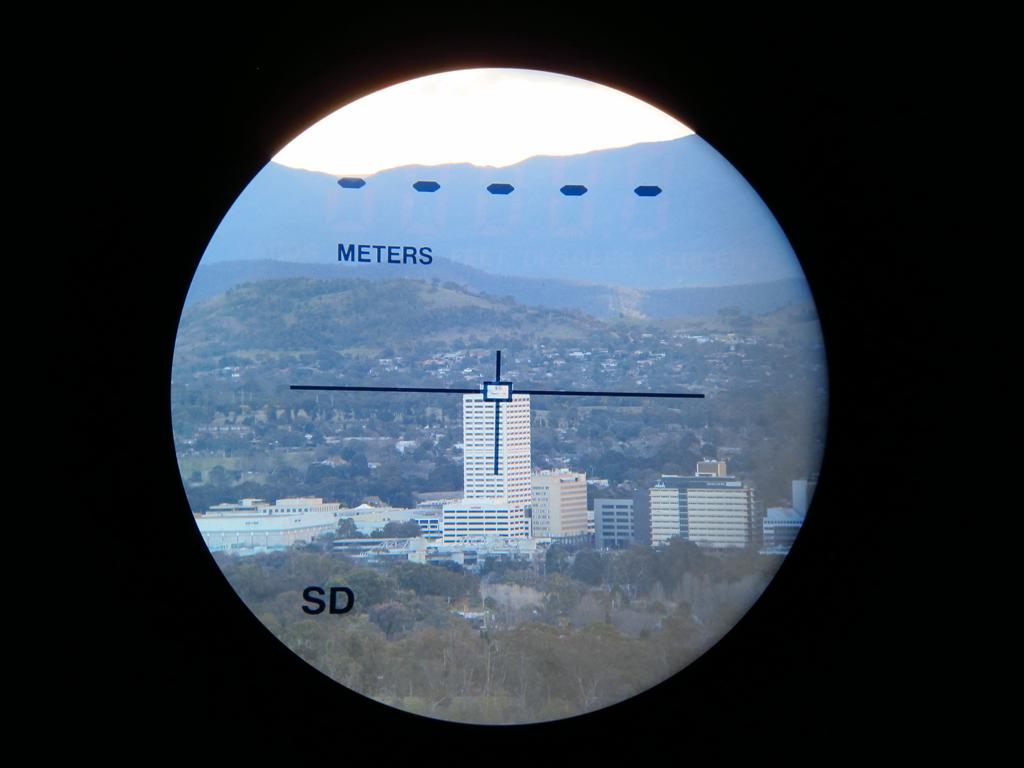
7x magnification is no problem at all for spotting things out to 2k and beyond.
I even had a go at Telstra tower just in case the 200/B will actually go further than 2k’s
(like the Nikon will exceed it’s nominal 500 metres.)
Nope.
Five and a half k’s is a little bit optimistic though.
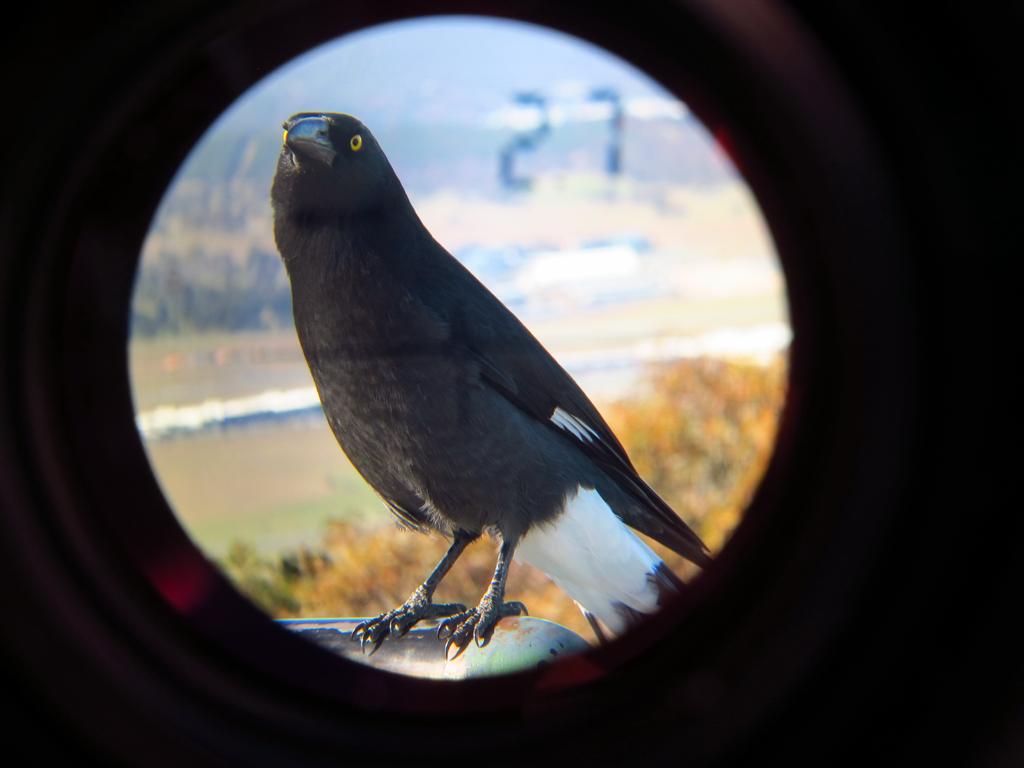
A currawong landed on the railing, so I gave it a blast at 2.7 metres.
It just gave me a filthy look.
With much disappointment, I couldn’t get anything exactly 2km away to test for hard limits to the computing power of the unit.
This was as close as I got.
The one further up is out of range. :(
Walking back from the edge put the longest responding sign out of view.
Going back to the higher point near the warning light would have possibly got me
just on 2km, but I ran out of time and had to head off to Canberra Archery Club.
On the way to my car, I tried just car number plates. You don't need much of a
reflective surface, but every bit helps.
I wanted to stay longer, but archery target butts don’t repair themselves.
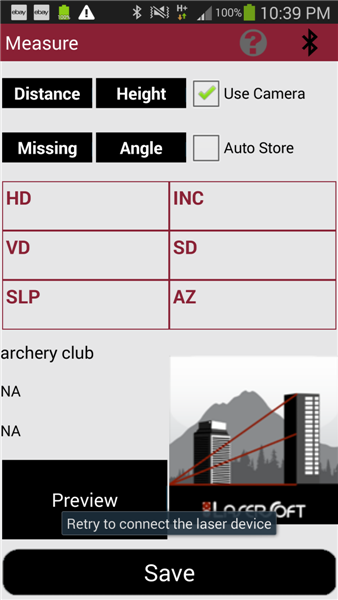
Once the working bee had finished, I set about with the Measure Application which runs on an android or apple phone.
This is where the 200B becomes an instrument rather than just a rangefinder.
The application connects to the rangefinder and records what is seen through the optical sight along with all the data computed.
Regardless of what ranging mode you’re using, all the data is stored.
This means that when you switch modes within the device, you’re actually only switching what is displayed, rather than what is worked out.
All the information is always available from the data gathered.
To properly use this application, one should actually order the adaptor that holds the phone against the eyepiece.
To use it, once the phone is paired to the rangefinder, you would fire up the application, attached the phone to the rangefinder and hit the preview button
on the phone application.
This lets you view the rangefinder through the phone camera.
When you hit the rangefinder fire button to trigger the laser, if it gets a reading, the camera takes a photo a short time later.
Then the application drags all the info off the rangefinder via Bluetooth, resizes the image and co-ordinates the lot together.
Even cooler, you can make a project consisting of a crapload of different ranges
to things and then email the entire lot off as a compressed webpage to anywhere
on the planet and beyond from within the application. It just asks you which
email option to use.
I paid the big ten dollars for the app, because this really was a feature that I think was worth trying.
It had some small issues.
The field of view is a little narrow with my Galaxy S4. It shows what was aimed at, but probably wouldn’t show the entire view with the readout even with the proper phone holder.
Saying that though, it’s redundant to see the picture of the display because the distance information is right next to the picture on the project webpage anyway.
The picture is only really to show you what you were pointed at.
For some reason that I can't explain, the thumbnail images are rotated in
Firefox, but not Internet Explorer.
You'll note the Auto Store option, which isn't ticked in the screenshot above.
When I used this initially, it just saved the picture each time the rangefinder
reported a distance.
However, the same data attributes from the rangefinder were given to every image
recorded for the next sixty seconds. Then it added the data correctly to that
image and then gave that new data to every other image for the next minute until
that data was purged.
This didn't happen with auto saving unselected though. This gives you the option
of checking every data collection and image, which is how I built the small
building distance project at the club.
Click here
to check it out!
There’s also a field for Azimuth which isn’t filled in because the magnetic compass is incorporated in more expensive
360 models.
Why would you want Azimuth as well?
Having the change of direction also recorded is where the magic really happens.
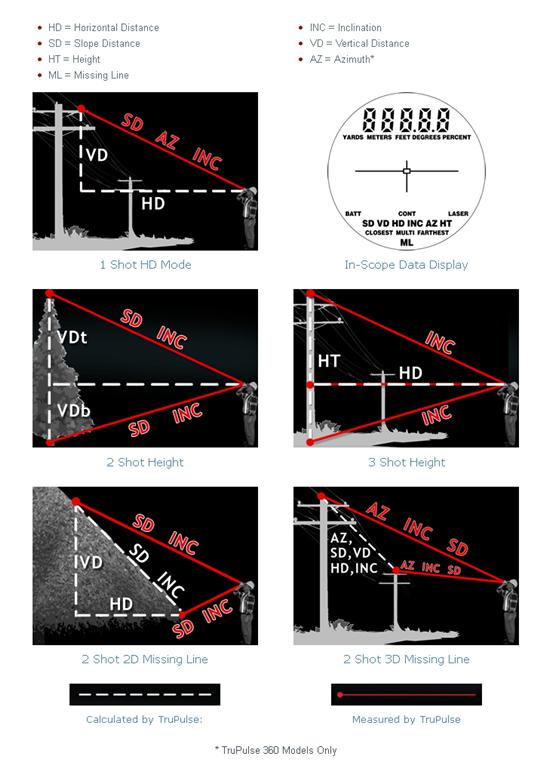
With just one bit of information, like the time taken for the laser energy to return, you can measure the distance to an object.
With distance and inclination like this particular model has, you can calculate in two dimensions.
We can stand at the base of a tree and actuate the fire button while pointing at the top and bottom (or just the top) of the tree.
The rangefinder does the trigonometry and can work out the height and horizontal distances involved.
For archery and ballistics stuff, you REALLY want inclination measurement
With a heading change, you are measuring in three dimensions.
The TruPulse 360 series can do more trigonometry in a millisecond than you spent your entire life trying to forget.
All that Sine/Cosine stuff actually does have an application.
Say, I wanted to make one of those terrifyingly long flying fox or zipline rides like they have in Malaysia (and probably New Zealand)
I need to know how far apart some hilltops are and if they’d be suitable to run the cable between.
I send two guys up to the tops with reflective cats-eye type stuff and range to both of them from some point that can see both.
The 360 series can then compute the distance between the two points AND their relative heights to each other.
And that's just the most simple of the five computed bits of information
relative to the two points you just measured.
The illustrations from the company website show what can be worked out by the
units that record azimuth as well as inclination and distance in the last panel
in the series below.
If you need to know this sort of thing, you're impressed.
I don't need this sort of capability and I still am.
However, I shall use it for important things like checking
the target at the 70 metre line.
It looks pretty good.
How far away is Conan?
Maybe I'd best check the differences between the Nikon and Trupulse with a bit
more distance?
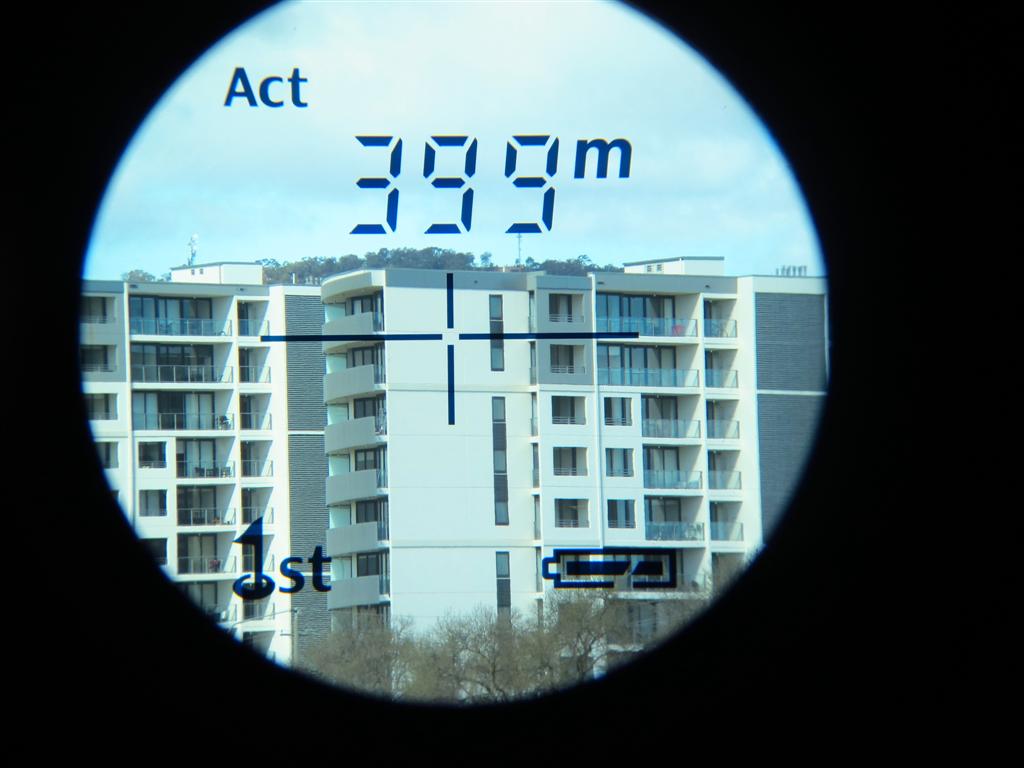
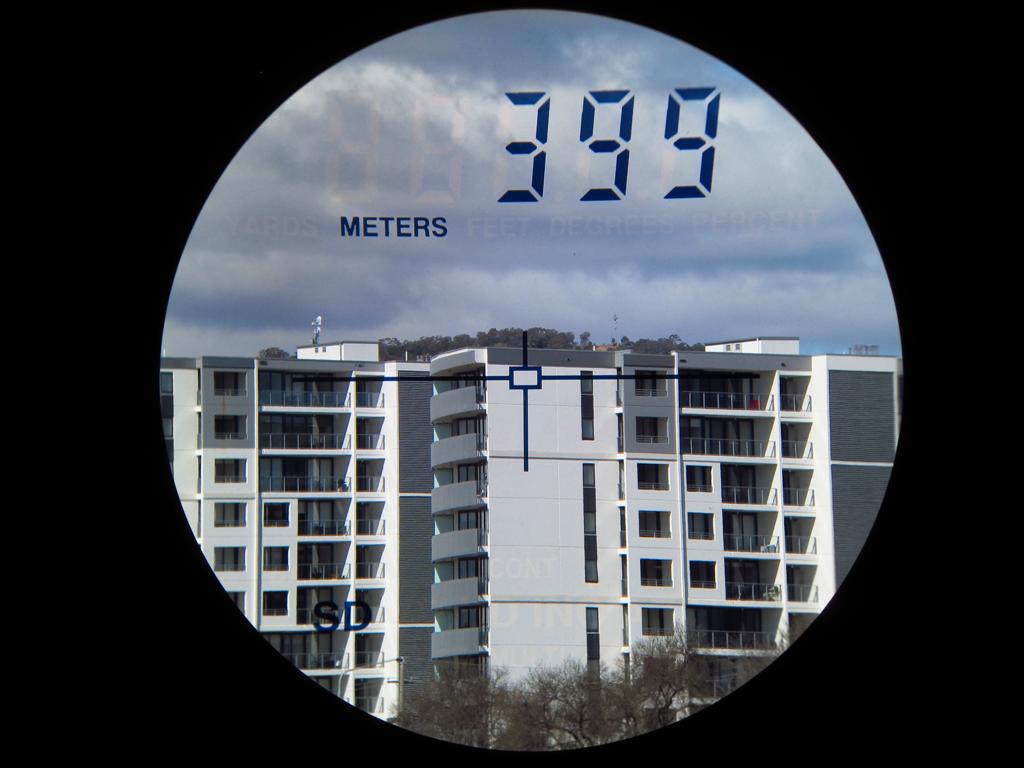
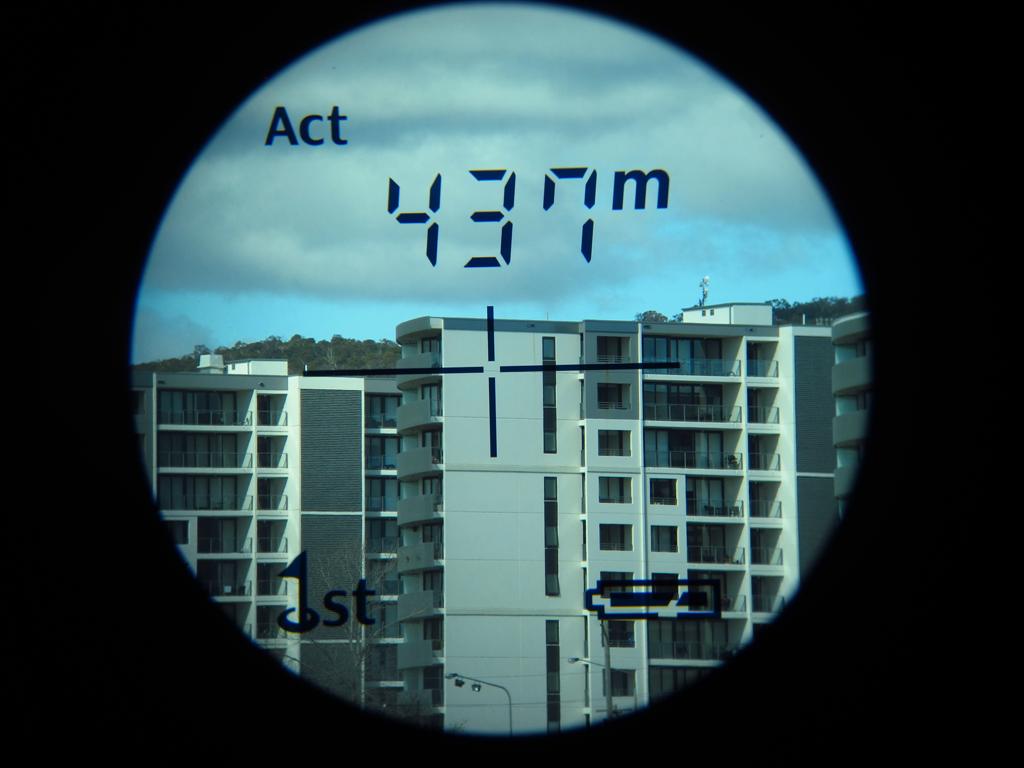
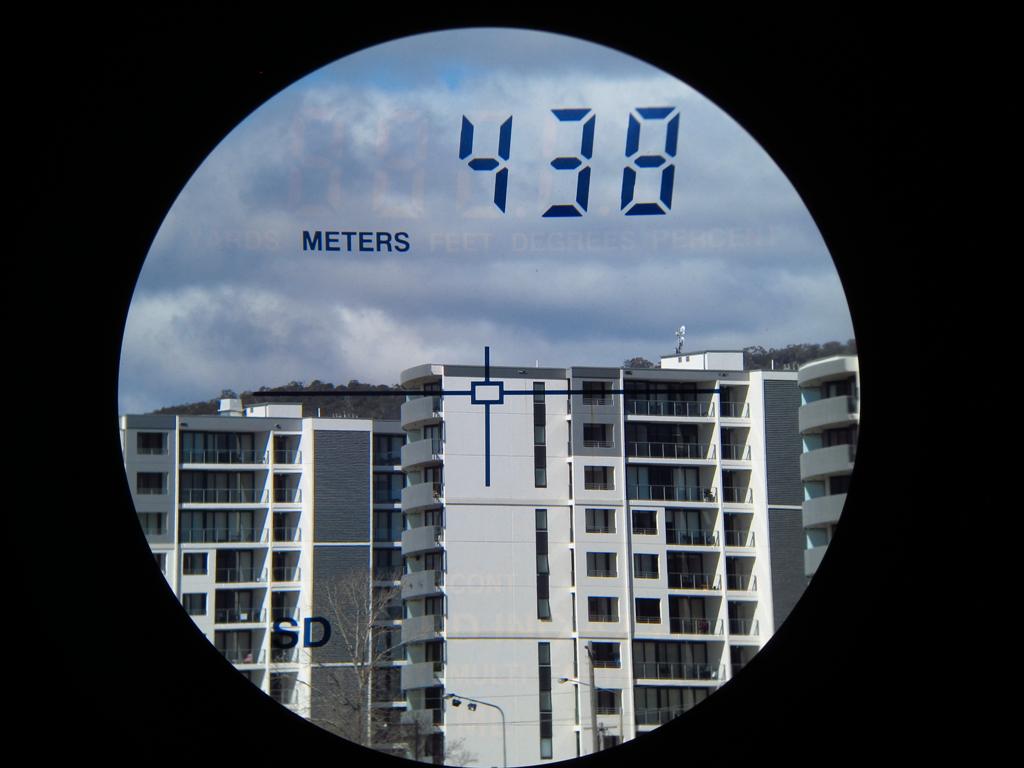
Here's where I made the mistake of ranging the correct building, then taking the
photo to the point on the previous one.
If I hadn't told you that, you may not have noticed. This is where having
something on a tripod prevents simple mistakes. The Nikon doesn't have a tripod
mount.
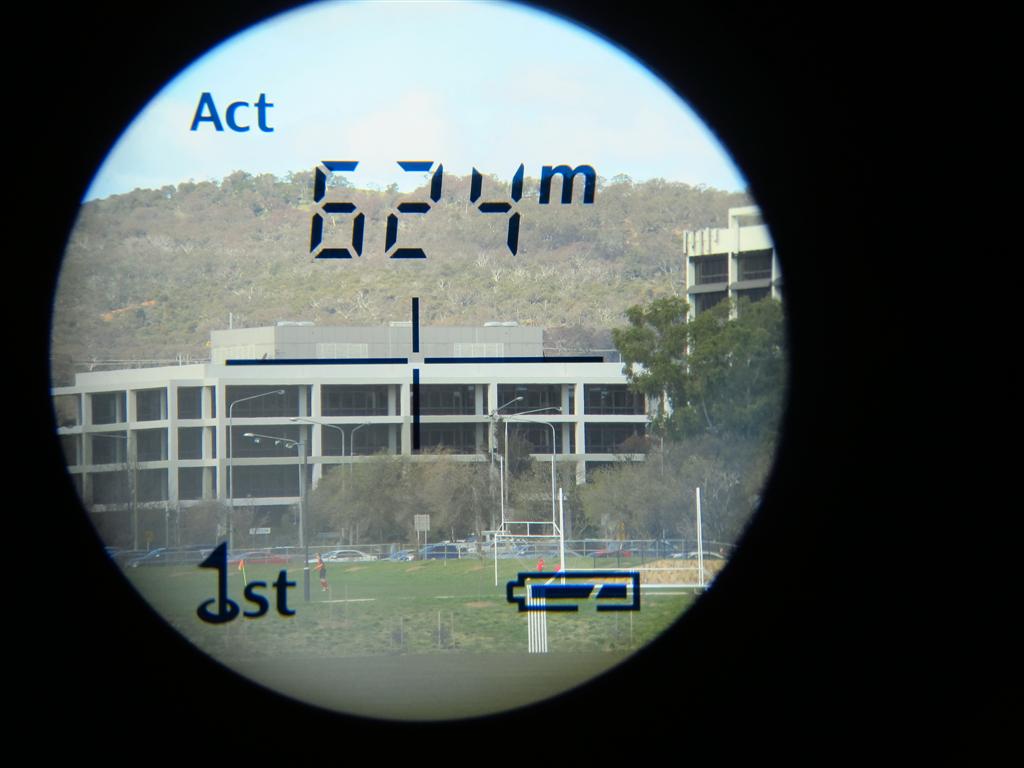
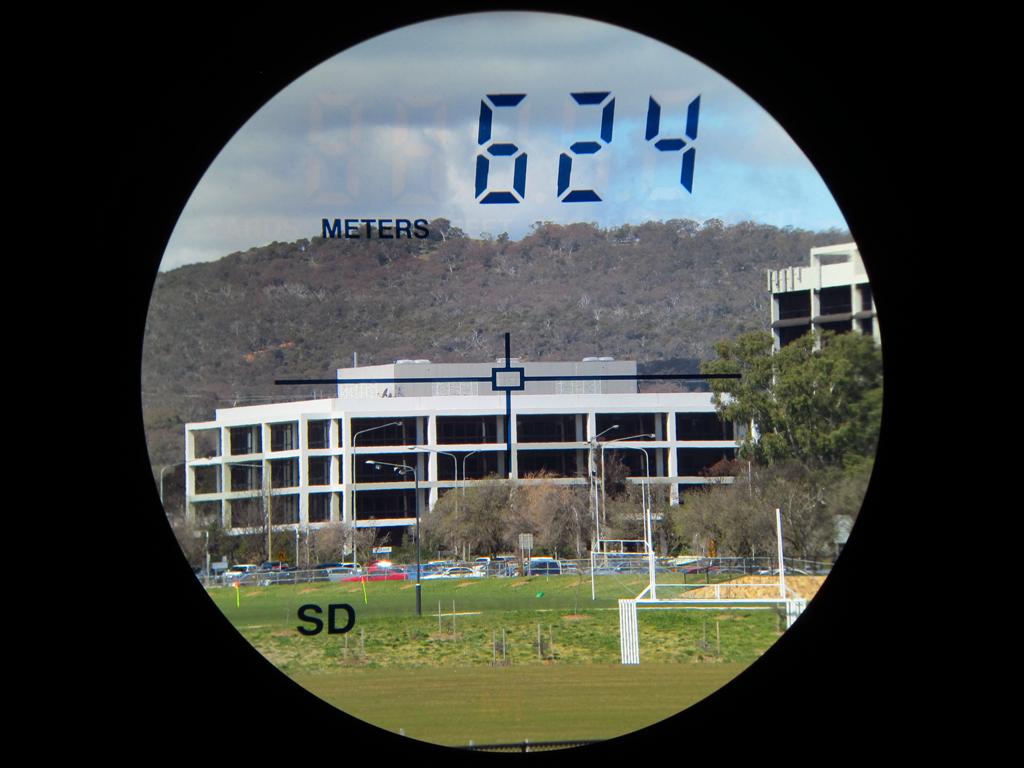
The Nikon can't get a reflection off the Telstra sign. The TruPulse nails it.
Having exhausted these exciting options, I headed out to the Canberra Gun Club.
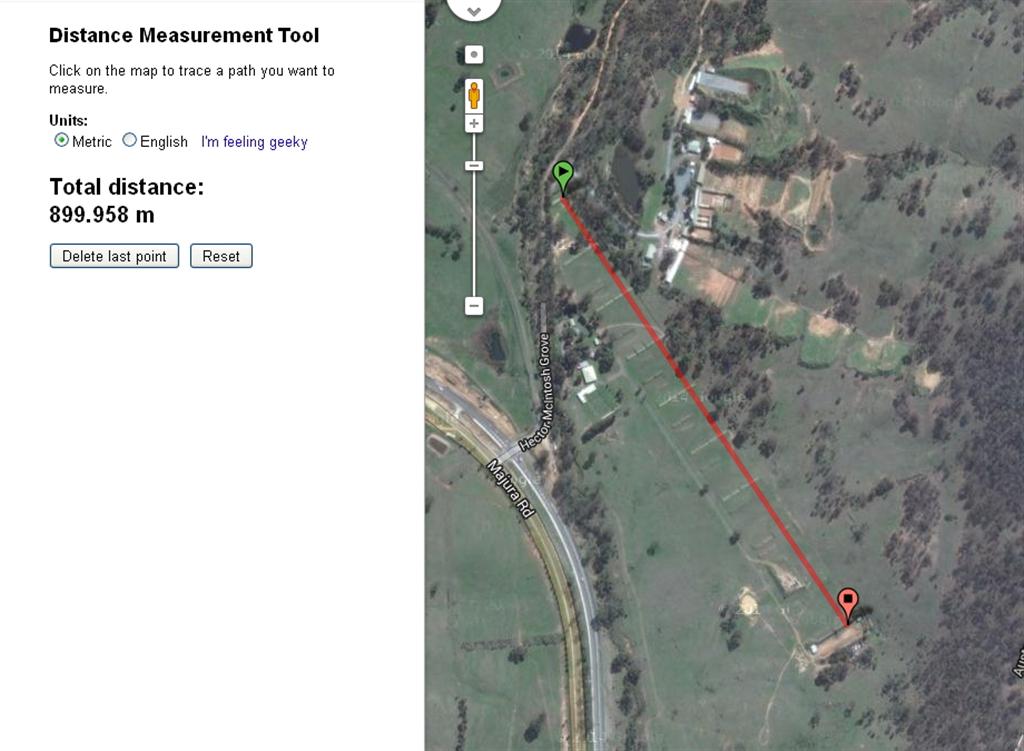
I know that their 1000 yard range is measured accurately.
I've even checked it with Google maps. The 900 metre concrete pads are easy to
see, but the 1000m bench rest tables, not so much.
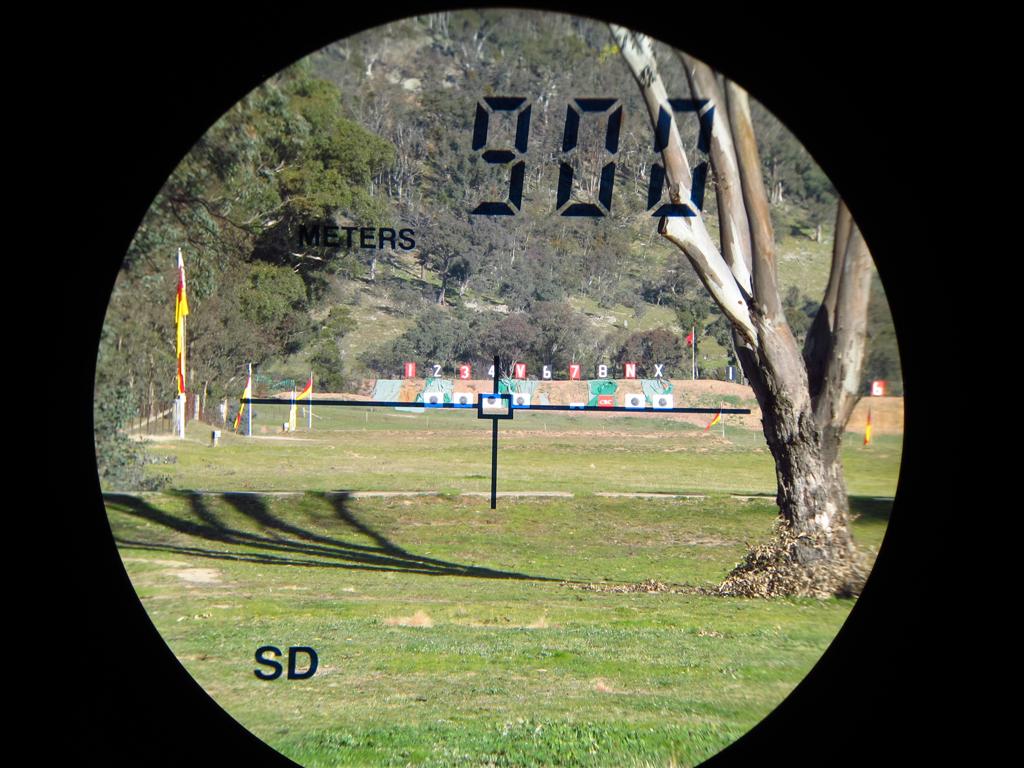
That afternoon, the club was shooting at 900m.
This meant that testing at LESS than 900m was going to be slightly hazardous.
No big deal. 900 will do.
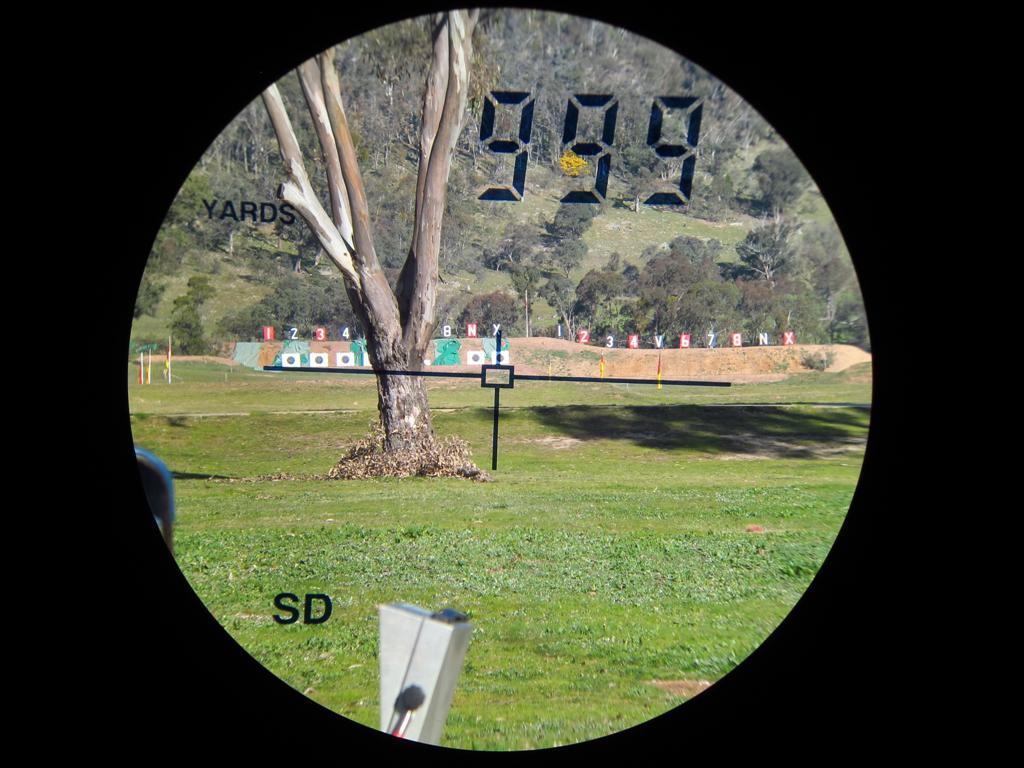
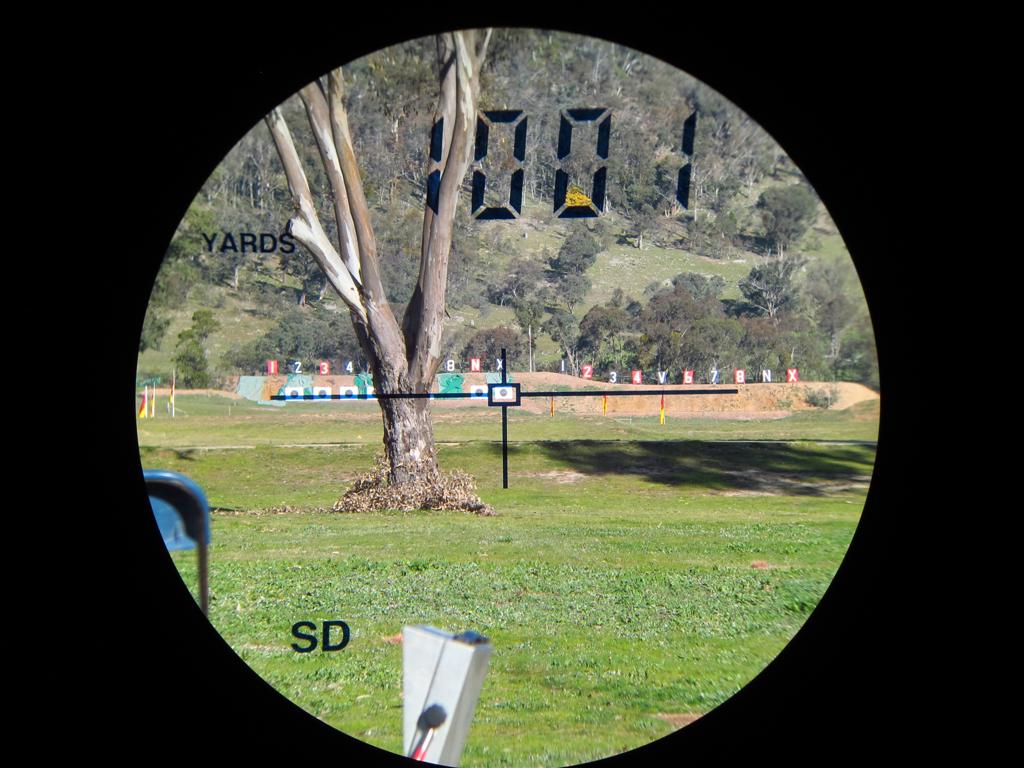
However, I first tried things out at the 1000 yard line.
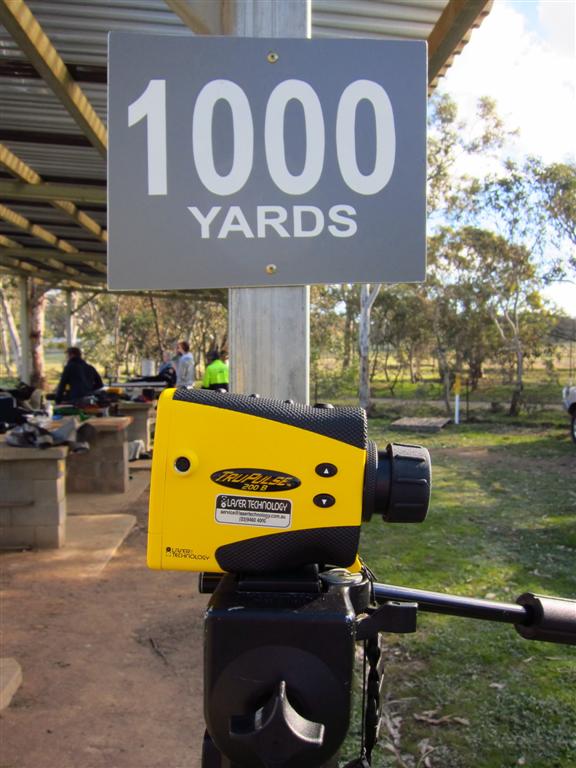
Nobody was quite sure where the 1000 yards is measured to, so I tried at the
front of the bench and then realised that I could make life easy on myself by
turning the unit over to yards.
This is what we ended up with. (I bumped the rangefinder off line so it's not
perfectly on target for the photo.
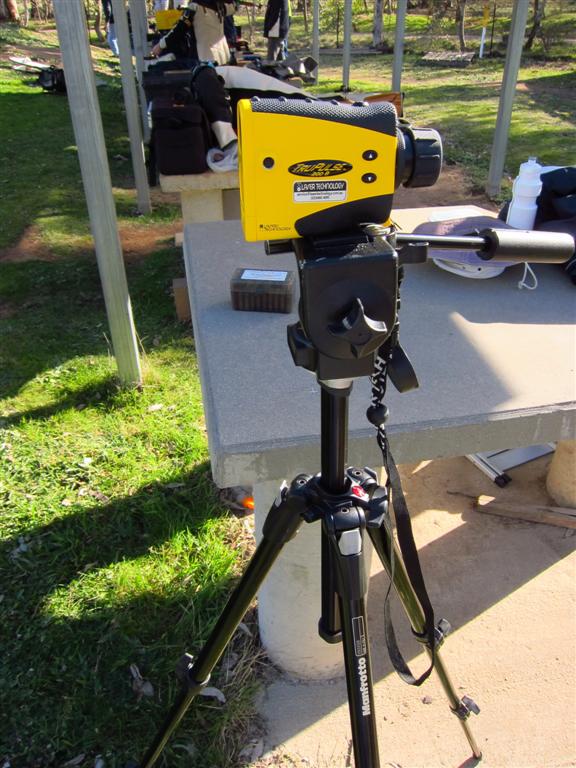
So I moved to the back of the bench.
By this, you may suspect that the bench is about two yards long?
A few of the crowd were interested in what I was doing, so I spent a bit of time
explaining and a few shooters had a drive of it and ranged various things.
They'd never seen this done before at this distance and were quite impressed.
Once everyone stopped shooting and packed up for the day, I set up on the edge
of the 900m shooting pad.
Once I realised that now I should range target four because I was on pad four, I
got what I expected.
That's a reasonably non reflective target, being matt black. It took a few
seconds to get a result, but I have no doubt that I would have got it if I'd
been able to go back another 100 metres
After that, I decided to head to the Red Hill Lookout as it offered potential in
both directions.
I figured that for the hunters, I should try a non reflective animal at
distance. Being as we have no deer conveniently roaming golf courses, I tried a
little kangaroo.
That was impressive.
I'm not that sure about it though. How about that bigger one behind?
Well. Yet again I'm impressed.
I tried to see where the roo roughly was so that I could check it with google
maps. I'm still pretty happy.

After trying other things for a bit, I wondered if I should check out exactly
what was going on because I couldn't believe that such a small target was
getting a return from even that distance away.
So I pointed at a clear bit of grass and then tested some more grass around that
area.
Yep. It's getting a return on the grass. That's actually really impressive.
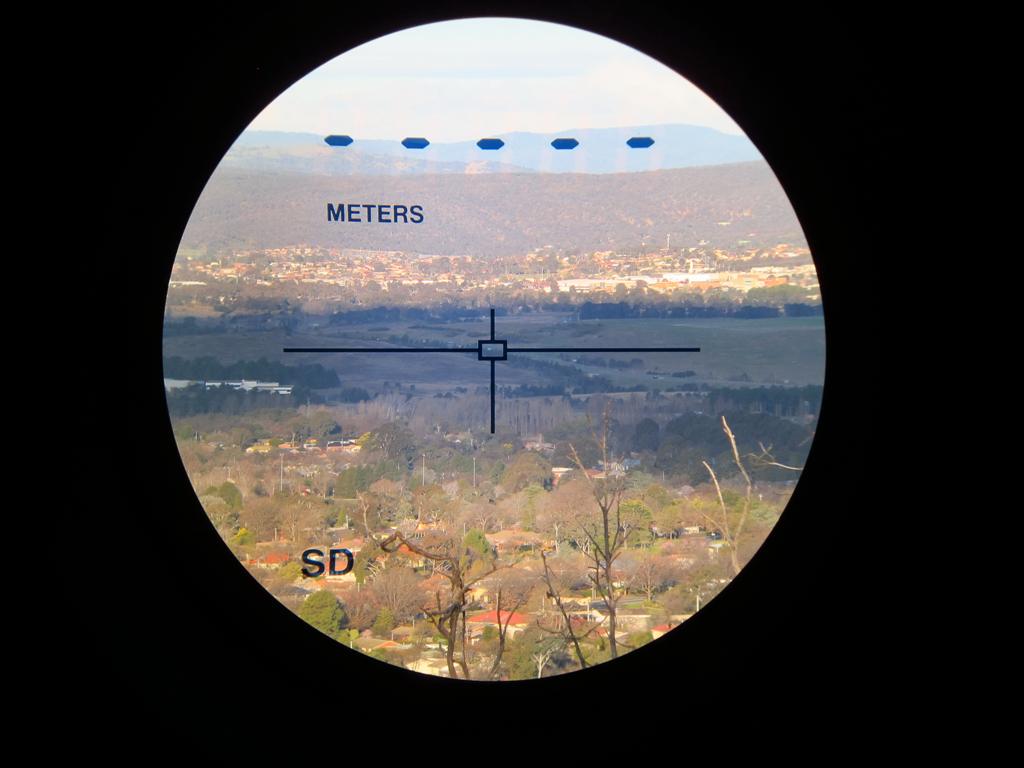
Woden's tallest building is over 3 k's away. Nope.
The biggest thing I could find from the lookout that was reflective is a sign on
Hindmarsh drive. I didn't realise how far it was away.
There's no way in hell I'm going to get anything at 5.125km
There's a small area that I can precisely locate closer to the town side of the
lookout. I had checked it in advance and knew that it was almost exactly 2km to
the flag on Parliament house.
Unfortunately, the flag isn't reflective at all.
I got some reasonable distances from there to other signs of course, but I
wanted something non reflective.
This is kinda cheating because technically, white is reflective. I'm claiming
it.
One of the biggest differences in terms of ease of use between the Nikon and the
Trupulse is the size of the eyepiece. It's brighter and far easier to take
photos through.
Even though the Nikon looks to have more magnification than the Trupulse, it
actually doesn't.
The viewfinder image is also much cleaner further to the edges. It doesn't
actually look like that in some of the pictures, but that's mainly camera
alignment issues.
Looking through it, it's a wider and nicer view.
It's not hard to prefer looking through the TruPulse. I really don't want
to give it back.
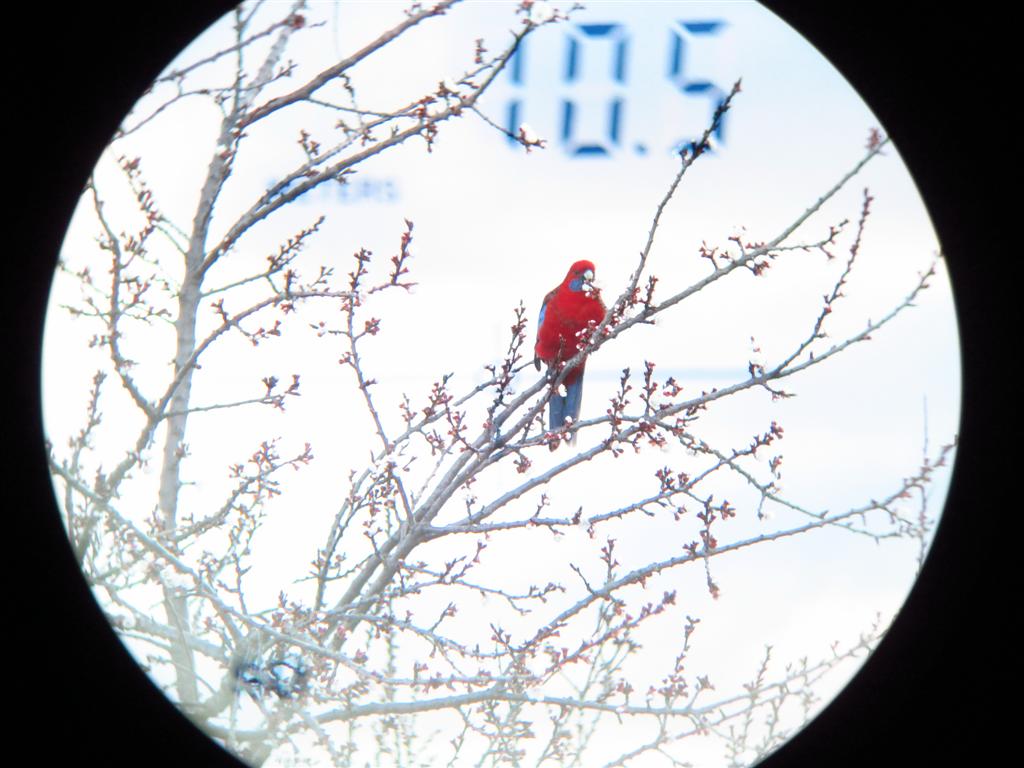
Digiscoping is a pastime invented not long ago. It involves taking photos of
birds through spotting scopes, but using small cameras.
I have invented digisneaking, where you get as close as you can before the birds
bugger off.
One of the neat things that I didn't explore enough was the three shot height
calculation.
The Nikon can measure the height of an object by taking two shots. The top and
the bottom. It does actually have to be able to range to the object though.
The Trupulse can do the same, but it has a neat trick where it can take three
measurements for a height reading. If you can't get a clear reading to one of
the ends, the TruPulse will measure the inclines of each shot and then use just
the angle on the reading that you can't quite get to work out the remaining
height.
It also has a feature where you can fit it with a "foliage filter" for taking
longer distance sightings through obscuring shrubbery.
With the filter fitted, one selects the foliage mode and then the level of
signal required to stop the clock increases. You combine this by using
reflective targets to mark your distances, ensuring the strong return is from
the marker and not any interfering leaves.
Very cunning.
I had a quick play with the Nearest and Furthest mode too.
With that, you can scan continuously across a number of targets and when you
stop, the nearest or furthest distance will be reported.
This can be of use when there are possibly reflective objects in front or behind
your ranging target.
After spending a good length of time over the week that I was lucky enough to
evaluate the TruPulse 200/B, I was pretty confident in it.
I took hundreds of readings with it and it just continuously outclassed my
Nikon.
Under 630 metres they were almost always exact or a metre different. The height
measurements I made were the same, but I didn't test that as much as I probably
should have to see how the inclinometre accuracies compared.
The Nikon is a fine unit and I now fully understand the concept of a
recreational rangefinder. I still love it, however, not quite as much as I
used to.
Of course, getting a measurement out to almost 2 kilometres is a hard act to
follow. Few recreational rangefinders will do it and the Trupulse will sit
neatly also in the recreational side of things.
But is it accurate out to that distance?
I had to wait until I got home to find out.
Looking at the 1988metre picture, I couldn't actually find the sign in question
on google maps. It's just not there.
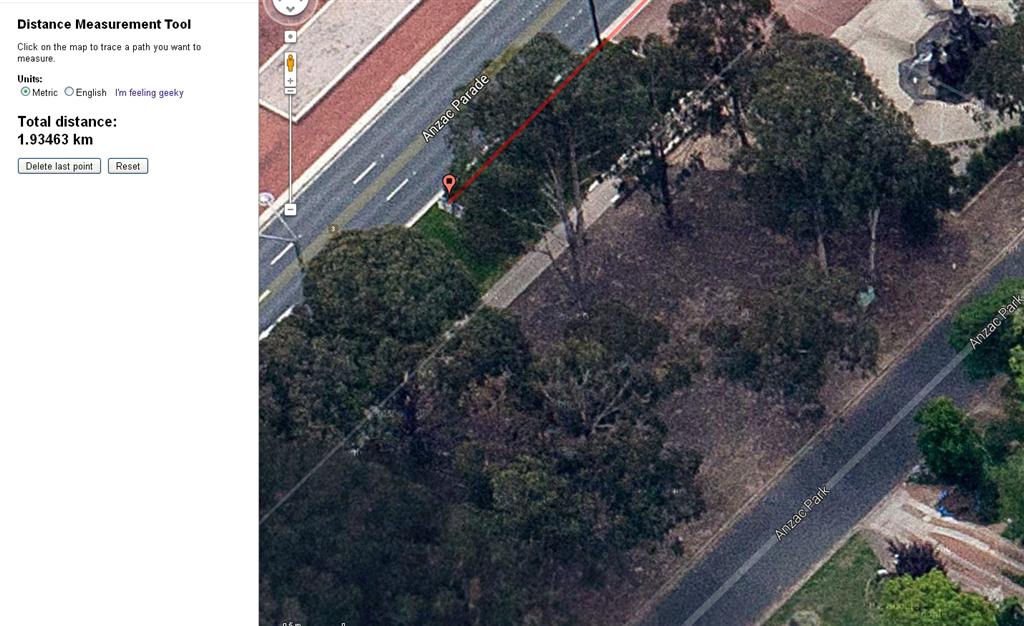
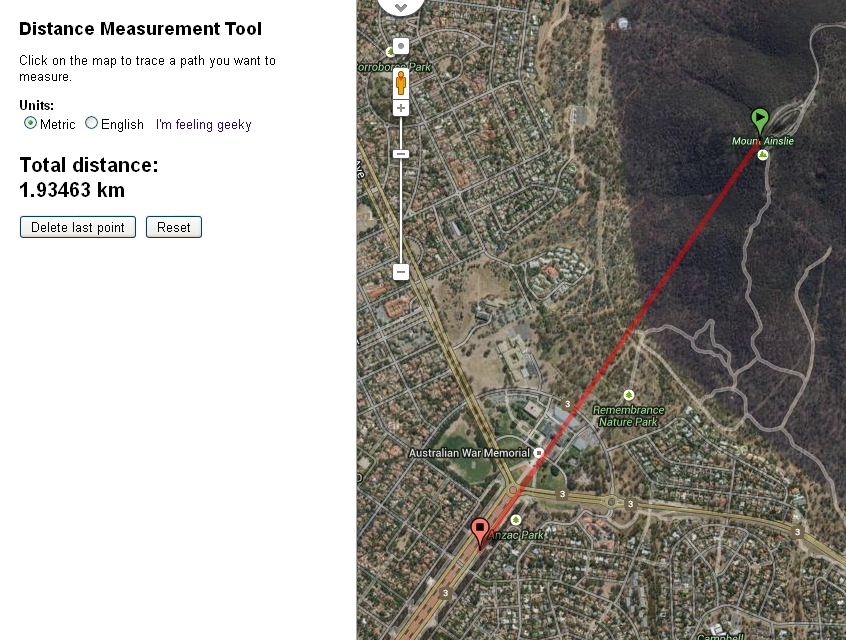
However, the next sign back is. Just remember it's 1934.6 metres.
Check it out.
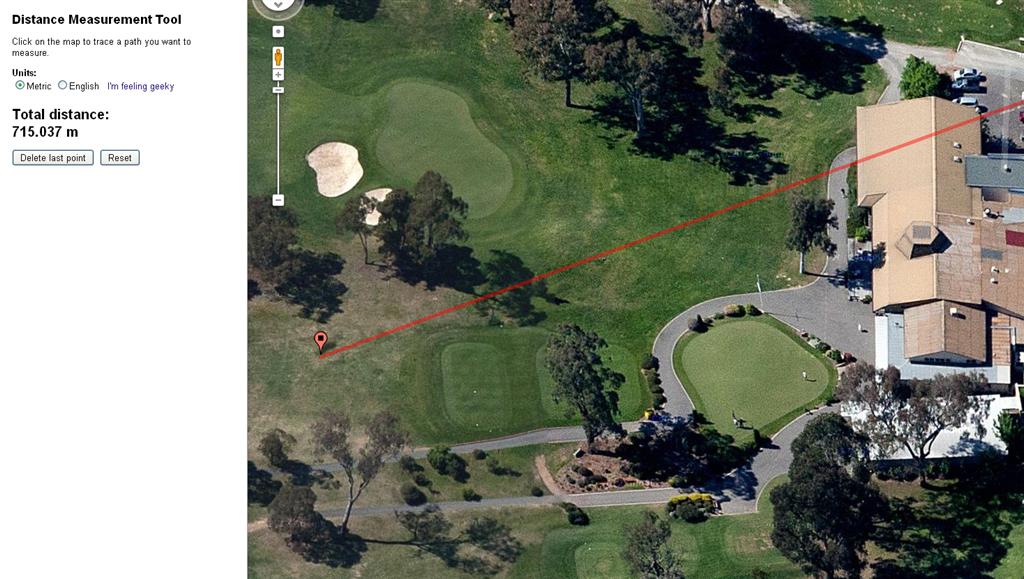
So, if we go from where I was standing at the top of Mt Ainslie...giving me
about enough room to use the tripod against the railing...
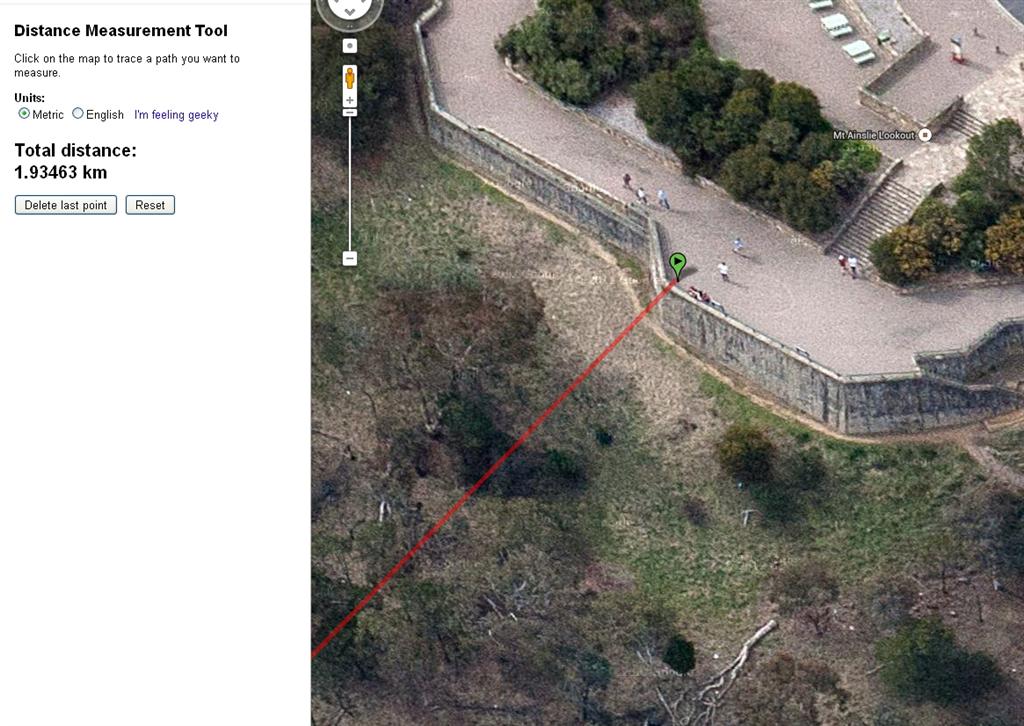
...and we measure to the sign...
Would you be convinced about how accurate it is now?
So.
I think my Nikon might be for sale.
The TruPulse 200 B has gone back to the great guys at
Laser Technology Australia in
Victoria.
I will miss it.
Of course, their 200 X IS accurate to 4 cm and goes out to 2.5km...
When is my next birthday?
At the time of review (1st Sep 2014) the TruPulse 200 B was
$1045.00 + GST
Compare that to what you'd pay for a less capable recreational rangefinder.
For a professional, it's a no-brainer.
*meter is the official American spelling of metre