Make your own Vacuumbagging equipment
You will find, like most things, once you have some experience with what you don't know about, it all becomes relatively easy. I have been lucky in that each time the necessity arose to find out about something, I had someone around that was able to demonstrate techniques to me or explain ideas. I was also just around when something was going on a lot of times. A lot of people don't have those opportunities and I would like to give a little bit of the knowledge that I have acquired, from myself and from other people to the masses.
There seems to always be a group of people who are searching
for information on how to do something. Here is my contribution on how
to go about making and using your own vacuum bagging and foam cutting
gear.
A word of warning.
This equipment needs a certain level of understanding about electricity and the dangers associated in working with it. If you are not competent in your wiring ability or electrical knowledge, please get someone who knows, to do the work for you.
Vacuum Bagging.
Vacuum bagging something is not "High Tech". I know people who vacuum bag their chickens before putting them in the freezer. How could you call that high technology?
All vacuum bagging does is to use atmospheric pressure to clamp something. This force follows contours exceptionally well and allows the application of HUGE amounts of force, for practically no weight. I can put the equivalent weight of parking my car on top of a wing in its cores, and then pick it up to check that everything is still aligned. How cool is that?
It also beats the hell out of having to have a bench built
like a brick outhouse and piling a ton of weight on top of it, in an
attempt to get the same amount of force that only 5 inches of mercury
would achieve. Although each method has it's proponents, how much help
does it take to figure out how to stack weights on a bench?
First thing you need is a vacuum source. I had a look at the different
ways to achieve this and came to the conclusion that the easiest and
most reliable way was to use an electric vacuum pump. You can of course
use anything that will pull an acceptable vacuum, but nothing else will
be as easy and reliable.
I had a look at what there was around and someone told me that a fridge
compressor was very suitable. (I think that it was Mike Schneider) This
is ideal as fridges are found around the world. People will continue to
clean their freezers with sharp things. People will be needed to fix
these freezers that were cleaned with sharp things, if possible. The
mere fact that you are able to access the internet means that the
ability to locate an old fridge compressor wont be too far away. This
compressor will also (most likely) use the available voltage in the
region which is a big plus.
Have a look in the yellow pages for a refridgeration mechanic and ask him if he has an old working pump that he would like to GIVE to a good home. Other than that, look around in the usual places that old fridges are found. Scrap yards and the like. Hey, you're a modeller. You must know about these things....
Anyway, have a look at my pump below. Yes it is rusty, but it runs quietly and it can even be used to pump up things, if you're willing to wait!
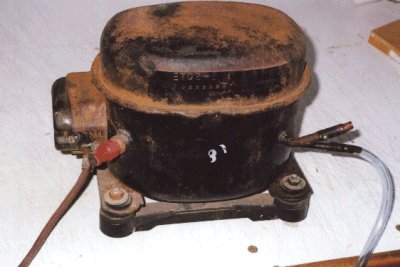
How do you find out if the pump leaks? Just put the out line into some water, while you are pulling a vacuum and then turn the pump off. If your vacuum is well sealed, and the pump leaks, water will be drawn into the "out" tube.
You may want to run the tube upwards with another piece of plastic tubing and put it into a suitable plastic funnel with a marble or ball bearing dropped into it. This is a good idea even if your pump holds vacuum. The pump is surrounded by oil, which keeps it lubricated.
Don't try to tip it out! It is there to lubricate and cool the pump!
Hey, don't use a ball which is too small or it will be jammed in tight and may get shot out when the pump starts. You could of course develop your own valve if you need to.
THE VACUUM SWITCH
Some people are in favour of constant running pumps with a bleed screw to vary the vacuum. I have a friend who thought that this was a simple approach so he made a bleed screw which worked very well,
until one night it sucked in enough dust to jam it up and he found his white foam wing was about 3 percent thick in the morning.
He is now in favour of pressure switches....
You can buy them, but they are easy to make. Take a look at the one knocked up at the MacDonald Precision Equipment Skunk Works. This is to give you an idea about how to go about making something like this.
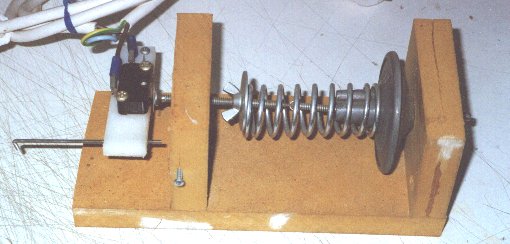
The spring that comes out of the vacuum advance is hooked through a bolt, and this is how you pretension the diapragm, as it was never intended to have to handle the vacuum that we will put on it.
The pretension can be adjusted by screwing in the wing nut that sits on top of the washer at the end of the pretension spring. The bolt will now slide slowly into the diaphragm as the vacuum builds and the microswitch sitting on the end of the plastic following arm will follow the bolt head in.
The long piece of black wire that is going into the end of the white plastic follower arm is actually a length of threaded rod that is used to adjust the cutoff pressure by setting the limit to which the microswitch can move inwards.
When the bolt is pulled in far enough, the microswitch switches and the pump will turn off at that point. The little arm on the microswitch has been removed, and because of that, the switch cycles in a very small pressure differential. Probably about 1 psi difference. This is not a problem if you have no, or very slow leaks. It is pointless having a reservoir on this system with the pressure switch set like this, so I took it off.
If you don't want to have the switch points set so fine, just leave the arm on the micro switch and let the bolt rest against this. Then you may want a reservoir. Mine is an old extinguisher that was tossed because it was dented. Whatever you use should be reasonably strong. If it isn't, all that will happen is that it will squash when you pull a vacuum. Test it first. Don't forget to watch it because if it crushes, it can go suddenly and it looks pretty cool.
The microswitch is a standard type. You should quite easily be able to find one at a Radio Shack or just about any electronics store.
I figure that mine will eventually burn the contacts and will need replacing. This one has lasted quite a while and although I have a heavier duty switch to put on to replace it, I want to see how long it lasts. ( It will probably let go in the middle of bagging my big expensive carbon fibre cross country wing) . I suppose I should replace it once a year. It only costs about 4 dollars. It is rated to 360 volts at 10 amps.
If you don't know for certain how to wire this up, please get someone you know to do it for you.
It isn't worth getting fried for this.
The follower arm is sprung with a rubber band that goes from the arm to the little screw on the side of the bolt support block. ( It isn't shown in the picture) It will eventually be replaced with a pen spring on the other side. What the hell. It works with a rubber band. I just change it every six months. (hang the expense)
The whole thing is covered with a perspex case, because I had it handy and it was the right size.
Remember, that unless you remote the microswitch into some sort of case, it is exposing live contacts where the wires go on, so think of safety first.
This pressure switch is connected into the system via some more tube and a T fitting somewhere in the main vacuum tube line. It doesn't matter where, but if you have any taps for running more than one bag at a time, you may want to have it near the pump.
A word about the tubing used to hook this all together. Make sure that the hottest days that you are likely to experience doesn't soften the tubing enough to make it go flat under vacuum.
This can be very bad.
The Vacuum Gauge
It is also possible to use a vacuum gauge out of a car, if you have a wrecking yard handy.
Try to get the newest and biggest if you decide to go the wrecking yard variety. If you have to make a little box for it to sit in, go ahead. Gauges are fairly delicate things and you will be relying on this to stop your wing getting pressed flat.
You may have to do some conversions to get from inches of mercury to psi or whatever you decide to work in as reference. Remember that your average white foam can take around 7 psi and your average blue foam can take whatever your pump can give. Grey foam or spider foam? You're on your own.
We don't have that stuff in Australia.
(Although we wouldn't mind getting some!)
Bagging Materials.
For small things, the best stuff to use is polythene shopping bags. Cheap, already sealed at one end and it conforms beautifully. Just the thing for doing tailplanes, templates, chicken and needlework. ( I once bagged some cross-stitch for my wife. It looked really good as everything came out looking embossed)
For slightly larger things, Plastic Garbage bags are the next step. John Stapleton opened my eyes to this. For larger things like wings, you need to find a plastic bag manufacturer who sells the plastic tubing. Have a look at what you can buy and test with your fingers just how thin you can go before it starts to look a bit fragile. Putting tailplanes into plastic bags is one thing, but sliding a wing and everything assorted into a long thin tube of plastic is another. You don't want to go putting tears and pinholes in the plastic when you're sliding a wing in.
Get something that will resist damage, but won't be too hard to fold if you need to, or conform to whatever you're bagging.
You can seal the bag with good old masking tape, caulking, blue tack, or a commercially available bag clamp.
I have been experimenting with pvc pipe by sanding one piece into a C shape so it just fits over another. It is pretty damaging to the small polythene bags, but the bigger tubing seems to work.
I have also thought of using the little AA battery powered bag sealers to see if they will do the job. Once again, your imagination is your best friend and it costs very little to experiment.
If you buy your bagging material in a roll, just leave the end rolled up and secured and use what you have to at the time. It makes for easy recycling and it shouldn't leak. (Check it though)
ATTACHING THE BAG TO THE PUMP
At first we just used to push a piece of tube from the inside of the bag to the outside. It works well on some materials. The bag material stretches and then breaks leaving a stretched portion around the tube and you can leave it like it is, if the seal is good or put rubber bands or blue tack around it to seal it to the bag if it isn't, or just for piece of mind.
Then Andrew Goddard of Sydney showed me a little gadget that does the trick really well. Basically it is a disk with a tube that goes through it. The tube is sized to fit your vacuum hose and is sealed to the disk to make it airtight, with the tube side of the disc covered with blue tac. The tube is pushed carefully through the bag, or a small hole is made for it and the blue tac seals perfectly to the bag. Don't make you disc too small. about 50 mm or 2 inches is good.
Remember to place the disc inside the bag on top of some loose weave material. You could glue a matching disc of some material to it (on the edges of the bottom side of the disc) to stop the bag material coming up hard against the tube and blocking the flow. Your wifes green plasticky scouring pads are perfect for this. (Make sure that they are used first. No point in wasting money/irritating the wife. Just make sure they're clean)
Hot melt glue is the perfect partner.
Breather Cloth
I bag with the cores inside the bag as it will push any high points down, like spars and the other layed up construction that is still green when the skin is going on.
Different people have different methods. I have seen some argument on RCSE about what is better. Eggs are only acceptable as food sunny side up too.....
I don't have any peel ply, so I don't care. I have been going to try using some rayon as peel ply but as I haven't had a use for it, I haven't bothered. Has anyone tried this?
As a medium for vacuum to travel through the bag, you can use just about anything that air will go through. Paper towels work well, but a thin fabric is a bit easier to keep arranged in the bag if it is a big one. It doesn't have to be in one piece as long as it overlaps. Just try to not let it be too thick as it may not conform around the foam as you want it.
Don't wait until you have something in the bag to try out all this. Make sure that the way you do things results in as few leaks as possible. I haven't yet achieved the airtight bag yet, but I have come damn close. I would consider 10 seconds of pump activity per hour to be extremely acceptable. This is about as good as I have got. If I am bagging templates with 5 minute epoxy, I just let the pump cycle at whatever it likes and then watch TV until I remember it later on. It hasn't got very hot yet....
Once you have all this stuff set up, it is time to check the
system for leaks. Any point at which there is a connection is a
potential source.
Connect your tube to the pump and pressure switch via the T joiner and
block the free end securely with something that will not leak. Folding
it over a few times may work quite well. We are trying to make the
system airtight and don't want any false alarms.
Start your pump and set the switch with the vacuum fairly high. Make
sure the pump is turning off though. We need to see how long it takes
to switch on again. At this point you could attach a line to the out
tube from the pump and dip it in water to see if the pump is leaking.
(I hope you are using clear tubing)
Hopefully it won't suck any water when it is turned off.
One of my hardest to find leaks was at the T piece. If you intend
making this connection permanent, which it should be, you have to be
sure that it doesn't leak. If you do find that your pump is turning on
and off pretty quickly, it is just a matter of the handy silicone
sealant (rtv rubber) or hot melt glue, applied in the appropriate
possible places. The longer your pump stays off the better.
With every extra fitting added to the plumbing, your cycle time should
stay the same. Make sure that you eventually test all the pieces of
equipment you add to your system that you would normally use eg,
reservoir, extra taps for more bags etc.
If you have eliminated the leaks from your plumbing to the bag, at
least you know where the most likely leaks are coming from. You should
be able to hear leaks in the bag, if they are big enough.
Nothing is more annoying than checking the bag for leaks for ages and
then finding out the leak is where your vacuum gauge connects to the
rest of the system. (Trust me on this one)
Time passes a lot more quickly once you are trying to fix something and
you have resin going off. (Oddly enough, once it is all in the bag and
finished, it can only be 24 hours that you have to wait, but it seems
like a week...)
I supose there is not much more to add here. If you can think of a good
idea, please don't hesitate to email me and tell me of it
Other helpful stuff...
Remember that whatever you do, try it first on a test piece so that you can be sure that your release agent doesn't react with your paint system, if you are going to use the old "Paint your mylars first " trick.
It is also possible to use no release agent with mylar. Just make sure that you clean it with acetone and don't touch it again until you paint it
Once again, test how this is going to work before committing 300 bucks worth of Carbon Skin at 45 degrees.
Just a few of the people that have knowingly and unknowingly contributed to the culmination of information on this page are (in no particular order): Andrew Goddard, Klause Mittendorf, Mike Schnieder, Mike Elsner, John Stapleton, Don Berry, Richard Tapp, Charles Smith (Australia's best Soaring Oriented ISP), and Graham Garner.
Here are some more tips given to me by Dave Jones from Melbourne...
Tips from Sprockets Shed
We use the polythene sheet (200microns) from Bunnings (a local
Australian Hardware shop) cos it comes folded double and you cut it to
size.
Cut in 50mm from the sides on all bar the folded side. Duct tape the
ends top flap to bottom flap. This leaves the long side open (our
preference, no reason why you couldn't tape one short side and one long
side) to insert your job through. After job is inside bag duct tape up
the final opening. Keep top surface as flat as possible until the end
and where you inevitably end up with wrinkles in the corner.
When you tape the long side of a bag shut:
* if it's empty it tapes perfectly flat because there's nothing in it
to
deform the top sheet.
* when your job is in there, the top sheet won't tape down flat because
the
top sheet is deformed.
SO if you hold it out under tension while you tape it
(two pairs of hands makes it easier) you only end up with wrinkles and
a
poor seal at the very end.
Fold across the open edge three or four times and slide on one
of the poster hangers your Dad used to hang Disney posters on the wall
of your room as a kid. Commonly available at all framing shops up to a
metre long.
By the way, if you heat the end of the
poster slide with a heat gun when you first get it and bend the two
sides
out to 90 degrees across the corner, you make a guide at one end which
will
make it much easier to slide on.
If you can't imagine what I am describing go down to Harvey Norman (a
local Australian Appliance shop) and have
a look at the slides that close up the bags on a few of the upright
style
vacuum cleaners.
We bag with the jackets inside the bag and use nothing less than 14 thou Mylar (from a transformer winding supplier) to paint and layup cloth on.
Shade cloth makes a great breather cloth out side the jackets.
Taffeta cloth is even better than peel ply, just ask Manny Reidrich (of F5B Pelican fame) at United Patterns in Mordialloc. It's all he uses.
At the local aquarium shop, they sell check valves for about $2 ea that save making one way air valves. If the tubes at each end aren't big enough, just slide on some of that clear plastic tubing from Bunnings that's a bee's dick too small, no clamp needed and slide your 1/4 inch stuff over that.
4mm sprinkler fittings make cheap fittings when enlarged in the same manner.
Your pump will cut in and out less frequently if you use a bigger reservoir. Disposable R134 gas bottles from your local refrigerator/Air Con repair joint are perfect. You can fit the hose barb however you see fit. Or use old fire extinguishers or out of date 9kg gas bottles.
Anyone else got any hints?
Other Vacuum bagging links are:-Chris Foquets Vacbagging page